
“`html
If you have a sweet tooth and love the irresistible combo of chocolate and Oreos, then you are in for such a treat with this Oreo Pudding Poke Cake Recipe. This dessert is a perfect blend of moist, chocolatey cake infused with creamy Oreo pudding that seeps into every bite. Topped with fluffy whipped cream and a sprinkle of crushed Oreos, it’s like taking your favorite cookies and cream flavor to a whole new level. Whether for a birthday, family gathering, or just because you deserve a little indulgence, this cake will quickly become one of your go-to favorites.
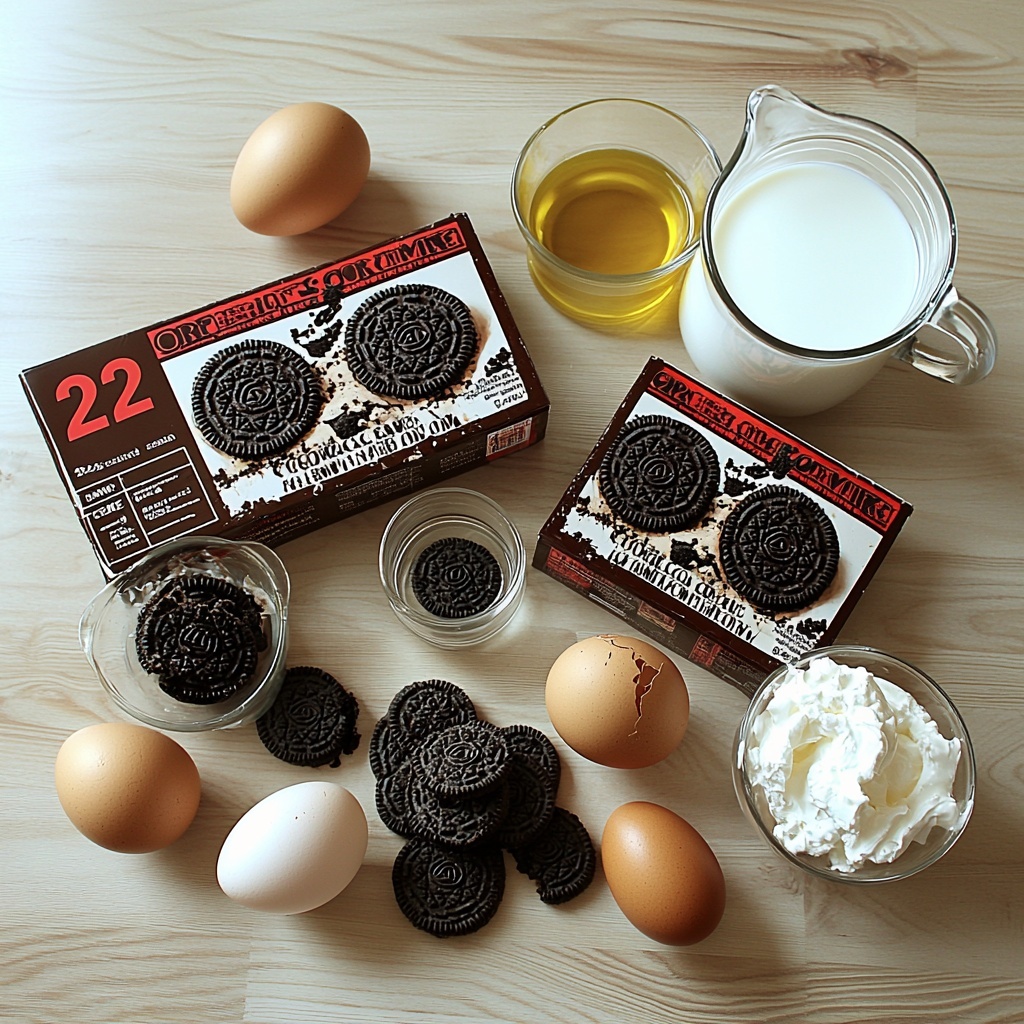
Ingredients You’ll Need
These ingredients are straightforward but essential to creating the perfect harmony of flavors and textures that make this cake unforgettable. Each one brings something special to the table, from the rich chocolate base to the luscious Oreo pudding filling and the light whipped topping.
- 1 box (15.25 ounces) chocolate cake mix: Provides the moist and fudgy cake foundation that everyone loves.
- Ingredients listed on cake mix box (eggs, oil, and water): Necessary to bring the cake mix together and ensure perfect texture.
- 2 boxes (4 ounces each) Instant Oreo pudding mix: Adds that creamy Oreo flavor with little cookie bits mixed right in.
- 3 cups milk (2% or Whole): Helps the pudding come together with the silky smooth consistency.
- 1 tub (8 ounces) whipped topping (Cool Whip), thawed: Creates a light, airy layer that balances the richness below.
- 6 Oreo cookies, crushed: A crunchy, chocolaty finishing touch that’s simply irresistible.
How to Make Oreo Pudding Poke Cake Recipe
Step 1: Preheat and Prepare Your Pan
First things first, preheat your oven to 350 degrees F to get everything nice and warm. Then, generously spray a 9×13-inch baking pan with non-stick spray to make sure your cake won’t stick after baking. This step might seem small, but it makes cleanup easier and guarantees your cake comes out in one beautiful piece.
Step 2: Bake the Chocolate Cake
Mix the chocolate cake according to the instructions on the box using eggs, oil, and water. Pour the batter into your prepared pan and bake until a toothpick inserted in the center comes out clean—this usually takes the time specified on your cake mix box. After baking, allow the cake to cool for about 10 minutes so it’s warm but not piping hot. This cooling period is crucial because you want the cake soft enough to poke but sturdy enough to hold the pudding.
Step 3: Poke and Prepare the Pudding Mixture
Using the handle of a wooden spoon or spatula, poke holes all over the warm cake, spacing them at least one inch apart. This is the magic step that lets the pudding seep deep into the cake, creating that incredible moist texture. Next, whisk together both boxes of Instant Oreo pudding mix with the 3 cups of milk until thickened and combined. The pudding might look a bit lumpy from the cookie pieces in the mix, but that’s exactly what you want!
Step 4: Pour, Spread, and Top
Carefully pour the Oreo pudding evenly over the cake, using the back of a spoon to spread it across and gently press the pudding into the holes. This ensures every nook and cranny is filled with creamy flavor. Then, spread the thawed whipped topping over the pudding layer for a light, fluffy contrast. Finally, sprinkle the crushed Oreo cookies on top, adding texture and that classic cookie crunch you crave.
Step 5: Chill and Enjoy
Place your masterpiece in the refrigerator and let it chill for at least one hour. This resting time allows the pudding to set inside the cake, making each slice perfectly creamy and delicious. After chilling, cut into slices and serve up smiles!
How to Serve Oreo Pudding Poke Cake Recipe
Garnishes
To make the presentation extra special, consider adding whole or halved Oreos on top for visual appeal and extra crunch. You can also dust the cake lightly with cocoa powder or sprinkle mini chocolate chips for a fun surprise in every bite. A dollop of fresh whipped cream on each slice can add an elegant touch and balance the dessert perfectly.
Side Dishes
This cake is rich and satisfying on its own, but if you want to complement it, serve it alongside a scoop of vanilla or mint chocolate chip ice cream. Fresh berries can also add a refreshing contrast, cutting through the richness with a burst of fruity brightness.
Creative Ways to Present
If you want to impress guests, serve the Oreo Pudding Poke Cake Recipe in individual glass parfait cups instead of a whole cake. Layer pieces of the cake with extra whipped topping and crushed Oreos for a delightful trifecta that’s visually stunning. Alternatively, turn the cake into cupcakes for easy serving at parties — just poke the holes and inject pudding into each cupcake before topping with whipped cream and cookie crumbs.
Make Ahead and Storage
Storing Leftovers
After enjoying your cake, be sure to store any leftovers in an airtight container in the refrigerator. This cake stays fresh and creamy for 3-4 days, giving you plenty of time to savor every last bite without worry.
Freezing
Because of its pudding and whipped topping layers, this cake does not freeze well. Freezing can alter the texture and cause the whipped topping to separate once thawed, so it’s best enjoyed fresh within a few days of making.
Reheating
Since this cake is best served chilled, reheating is not recommended. If you prefer it slightly warmer, allow the slice to rest at room temperature for 10-15 minutes before serving, but keep in mind that the cool creamy layers are part of what makes this dish delightful.
FAQs
Can I use homemade chocolate cake instead of a box mix?
Absolutely! While the recipe uses a trusted box mix for speed and convenience, a rich homemade chocolate cake will work beautifully and add a personal touch.
What if I can’t find Instant Oreo pudding mix?
If Instant Oreo pudding mix isn’t available, you can substitute plain chocolate or vanilla instant pudding and add crushed Oreos to the pudding mixture for a similar taste and texture.
Is it okay to use light whipped topping instead of regular?
Yes, light whipped topping can be used to reduce calories, but keep in mind it may be slightly less creamy and stable than the regular version.
Can this cake be made a day in advance?
Definitely! In fact, making the Oreo Pudding Poke Cake Recipe a day ahead allows the flavors to meld beautifully, and the pudding layer to fully set for perfect slicing.
How thick should I poke the holes in the cake?
Make sure the holes are about 1 inch apart and deep enough to pierce through the cake but not all the way through the pan. Using a wooden spoon handle is perfect for this – it’s just the right size for pudding to seep in without collapsing the cake.
Final Thoughts
If you’re looking for a dessert that is both simple to make and extraordinary in flavor, this Oreo Pudding Poke Cake Recipe is a total winner. It brings together everything you love about cookies and cream in an easy, no-fuss cake that will wow your family and friends. Trust me, once you try it, it’ll be your new favorite indulgence that you’ll want to make again and again.
“`
Print
Oreo Pudding Poke Cake Recipe
- Prep Time: 15 minutes
- Cook Time: 25 minutes
- Total Time: 40 minutes
- Yield: 12 servings
- Category: Dessert
- Method: Baking
- Cuisine: American
Description
This Oreo Pudding Poke Cake is a delightful chocolate dessert featuring a moist chocolate cake filled with creamy Instant Oreo pudding, topped with whipped topping and crushed Oreo cookies. Perfect for parties or a special treat, it’s easy to make and guaranteed to satisfy Oreo lovers.
Ingredients
Cake
- 1 box (15.25 ounces) chocolate cake mix (Betty Crocker’s Chocolate Fudge cake mix)
- Ingredients listed on cake mix box: eggs, oil, and water as required
Pudding Filling
- 2 boxes (4 ounces each) Instant Oreo pudding mix
- 3 cups milk (2% or Whole)
Topping
- 1 tub (8 ounces) whipped topping (Cool Whip), thawed
- 6 Oreo cookies, crushed
Instructions
- Preheat the Oven and Prepare Pan: Preheat your oven to 350°F (175°C) and spray a 9×13-inch baking pan with non-stick spray to ensure easy removal of the cake.
- Prepare and Bake the Cake: Follow the instructions on the chocolate cake mix box to prepare the batter using the required eggs, oil, and water. Pour batter into the prepared pan and bake until a toothpick inserted in the center comes out clean. Let the cake cool for 10 minutes.
- Make Holes and Prepare Pudding: Using the handle of a wooden spoon or spatula, poke holes about 1 inch apart all over the warm cake. In a medium bowl, whisk together both boxes of Instant Oreo pudding mix and 3 cups of milk until combined and thickened, about one minute. The pudding will have some lumps due to the Oreo cookie bits in the mix.
- Fill Cake with Pudding: Pour the pudding evenly over the warm cake, spreading it gently with the back of a spoon and pressing it softly into the holes to allow the pudding to seep into the cake layers.
- Add Whipped Topping and Oreo Crumbs: Spread the thawed whipped topping evenly over the pudding layer. Then sprinkle the crushed Oreo cookies on top for added crunch and flavor.
- Chill and Serve: Place the cake in the refrigerator and chill for at least one hour before serving to let the pudding set. Slice, serve, and enjoy this creamy, chocolatey Oreo treat!
Notes
- Allow the cake to cool slightly before poking holes to avoid breaking it apart.
- You can use reduced-fat or skim milk for a lighter version, though the texture may vary slightly.
- For best results, chill the cake for longer if possible—up to 4 hours—for more pudding absorption.
- Use whipped topping immediately after thawing for best texture.
- Crushed Oreos can be adjusted to taste for more or less crunch.


