
If you’ve ever dreamed of baking bakery-quality bread at home without the fuss of kneading, the No-Knead Artisan Bread Recipe is here to make that dream a reality. This straightforward recipe delivers a crusty, golden loaf with a tender, airy crumb that’s perfect for everything from sandwich-making to simply enjoying with a smear of butter. With just a handful of kitchen staples and a bit of patience, you’ll be rewarded with irresistible artisan bread that tastes like it came straight from a countryside boulangerie.

Ingredients You’ll Need
The beauty of the No-Knead Artisan Bread Recipe lies in its simplicity—the ingredients are humble yet essential, each playing a pivotal role in creating that perfect balance of flavor and texture. From the flour’s structure to the yeast’s rise and the salt’s seasoning, every component is key.
- 3 cups (375g) all-purpose flour: Provides the structure and body of your bread with just the right amount of protein for a tender crumb.
- 1 1/2 cups (355ml) warm water: Activates the yeast and hydrates the flour for a soft, elastic dough texture.
- 1 teaspoon (3g) active dry yeast or instant yeast: The magical ingredient that helps your dough rise, creating those delightful air pockets inside.
- 1 teaspoon (5g) salt: Enhances flavor and strengthens the dough’s gluten network for better texture.
How to Make No-Knead Artisan Bread Recipe
Step 1: Mix the Dough
Start by combining the flour, yeast, and salt in a large mixing bowl. Stir everything together so the yeast and salt are evenly distributed throughout the flour. Then pour in the warm water and stir until a rough, shaggy dough forms. The best part? No kneading is required here. Just mix until everything comes together.
Step 2: Let the Dough Rise
Cover your bowl with plastic wrap or a clean towel and leave it at room temperature for 12 to 18 hours. During this time, the yeast works its magic, bubbling up and doubling the dough’s size. Patience here is key—the long rise is what gives this bread its depth of flavor and airy texture.
Step 3: Shape the Dough
Once your dough has risen and looks bubbly and expanded, flour your hands and a clean work surface. Gently scoop out the dough and shape it into a round loaf without deflating it too much. Place it on a piece of parchment paper, cover it lightly, and let it rest for 30 minutes to 1 hour to relax before baking.
Step 4: Preheat the Oven and Dutch Oven
While the dough is resting, preheat your oven to 450°F (230°C). Place your Dutch oven inside the oven to heat up as well, allowing it to get nice and hot for about 30 minutes. This creates the perfect environment for baking artisan bread with a crusty exterior.
Step 5: Bake the Bread
Carefully transfer your dough along with the parchment paper into the hot Dutch oven. Cover it with the lid and bake for 30 minutes. This traps steam, which is essential for developing a crisp crust. Then, remove the lid and bake for an additional 10 to 15 minutes to achieve that gorgeous golden-brown finish.
Step 6: Cool and Enjoy
Once baked, take the bread out of the Dutch oven and let it cool on a wire rack for at least 30 minutes. This step is crucial as it allows the crumb to set, making it easier to slice and enjoy without squishing your masterpiece.
How to Serve No-Knead Artisan Bread Recipe
Garnishes
To elevate your No-Knead Artisan Bread even further, consider a little extra touch on top before baking—dust a bit of flour for that rustic look or sprinkle some sesame or poppy seeds for an engaging crunch and flavor boost. Fresh herbs or a light brushing of olive oil after baking also make a lovely finishing touch.
Side Dishes
This bread shines alongside soups, stews, and fresh salads. Imagine tearing off warm chunks to dip into a hearty tomato soup or serving it with a creamy garlic dip for appetizer bliss. Its versatile texture means it pairs beautifully whether you want something light or crave a comforting, satisfying side.
Creative Ways to Present
Slice your bread thick and toast it with a drizzle of olive oil and freshly crushed garlic for instant bruschetta. Or, hollow out the inside and use it as an edible bowl filled with dips or warm chili. The rustic appearance of your No-Knead Artisan Bread also makes it a stunning centerpiece on any table, showing off the beauty of homemade baking.
Make Ahead and Storage
Storing Leftovers
If you have any bread left over, store it wrapped loosely in a paper bag or a bread box to help maintain its crusty exterior without becoming soggy. It’s best enjoyed within 3-4 days to keep that fresh-baked flavor and texture at its peak.
Freezing
To keep your No-Knead Artisan Bread fresh for longer, slice it and store it in an airtight freezer bag. When frozen, it maintains its quality for up to 3 months, ready for you to pull out and toast whenever a bread craving hits.
Reheating
For the best results when reheating, defrost frozen slices at room temperature and warm them in a hot oven (around 350°F / 175°C) for 5-10 minutes. This method revives the crisp crust and warms the crumb beautifully, almost like it just came out of the oven.
FAQs
Can I use whole wheat flour instead of all-purpose flour?
Yes, you can substitute whole wheat flour for all-purpose flour, but keep in mind that whole wheat can produce a denser loaf. For a lighter texture, consider mixing half whole wheat and half all-purpose flour.
Do I really not need to knead the dough at all?
Absolutely no kneading is needed! The long, slow rise time allows the gluten to develop naturally, giving you that perfect artisan texture without the elbow grease.
What if I don’t have a Dutch oven?
If you don’t have a Dutch oven, you can bake the bread on a preheated baking stone or thick baking sheet. To mimic steam, place a pan of water in the oven during the first 30 minutes of baking.
Can I add herbs or seeds to the dough?
Definitely! Adding fresh herbs, seeds, or even garlic into the dough before the first rise can give your bread extra flavor and personality. Just fold them in gently with the dry ingredients.
How long does the dough need to rise?
The dough should rise for 12 to 18 hours at room temperature until it’s bubbly and doubled in size. This long rise is crucial for flavor development and a light crumb.
Final Thoughts
Baking bread at home has never been this approachable or satisfying, thanks to the No-Knead Artisan Bread Recipe. Give it a try, and you’ll soon have fresh, crusty bread warming your kitchen and filling your home with irresistible aromas. It’s more than just bread—it’s a delicious reminder that simplicity and patience make magic in the kitchen.
Print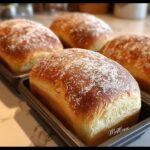
No-Knead Artisan Bread Recipe
- Prep Time: 15 minutes
- Cook Time: 45 minutes
- Total Time: 12 hours 60 minutes (including rise times)
- Yield: 12 servings
- Category: Bread
- Method: Baking
- Cuisine: American
- Diet: Vegetarian
Description
This no-knead artisan bread recipe delivers a rustic, crusty loaf with minimal effort. Using simple ingredients and a long fermentation period, it produces a bread with a chewy crumb and crispy crust, perfect for sandwiches or enjoying with butter and jam.
Ingredients
Ingredients
- 3 cups (375g) all-purpose flour
- 1 1/2 cups (355ml) warm water
- 1 teaspoon (3g) active dry yeast or instant yeast
- 1 teaspoon (5g) salt
Instructions
- Mix the Dough: In a large bowl, combine the flour, yeast, and salt, stirring thoroughly to distribute the ingredients evenly. Add the warm water and mix until a shaggy, sticky dough forms. No kneading is needed.
- Let the Dough Rise: Cover the bowl with plastic wrap or a clean kitchen towel and let it rise at room temperature for 12 to 18 hours, until the dough is bubbly and has doubled in size.
- Shape the Dough: Flour your hands and a clean surface, then gently shape the dough into a round loaf. Place the shaped dough on a piece of parchment paper and let it rest, covered, for 30 minutes to 1 hour.
- Preheat the Oven and Dutch Oven: Preheat your oven to 450°F (230°C). Place a Dutch oven inside to heat for 30 minutes, ensuring it gets very hot before baking.
- Bake the Bread: Carefully transfer the dough along with the parchment paper into the preheated Dutch oven. Cover with the lid and bake for 30 minutes. Then remove the lid and continue baking for an additional 10 to 15 minutes until the crust is golden brown and crisp.
- Cool and Enjoy: Remove the bread from the Dutch oven and place it on a wire rack to cool completely before slicing to preserve the crumb texture.
Notes
- Use a kitchen thermometer to ensure your water is warm (about 100°F/38°C) to activate the yeast properly.
- The long rise time at room temperature develops flavor and texture without kneading.
- Be sure to preheat the Dutch oven to create steam for the perfect crust.
- Allow the bread to cool completely before slicing to prevent it from becoming gummy inside.
- You can substitute bread flour for all-purpose for a slightly chewier texture.


