
If you adore creamy, nutty desserts that don’t require turning on the oven, then this No-Bake Pistachio Cheesecake Recipe is an absolute must-try. Imagine a buttery biscuit crust layered with a fluffy, luscious pistachio-infused filling, all beautifully topped with vibrant green pistachio spread and fresh strawberries. It’s a dessert that feels indulgent yet surprisingly simple to make, perfect for impressing friends or treating yourself to a little slice of heaven.
Ingredients You’ll Need
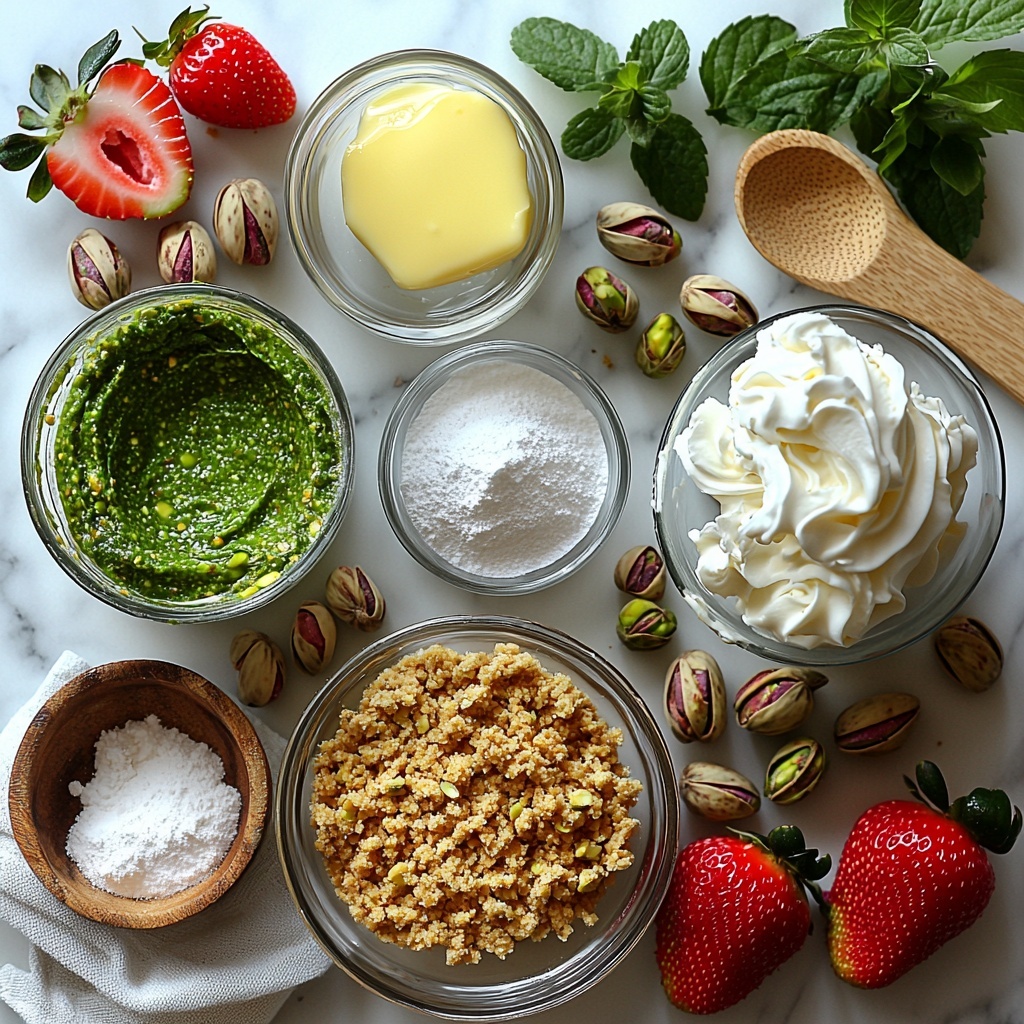
Getting started with the No-Bake Pistachio Cheesecake Recipe means gathering just a handful of straightforward ingredients that work harmoniously to create an irresistible texture and flavor. Each one plays a key role—from the crunchy base to the silky filling, and the naturally nutty pistachio touches throughout.
- 200 grams biscuits: The foundation for your crust that provides a delightful crunch and a buttery backdrop.
- 45 grams melted butter: This binds the crushed biscuits together while adding richness to the crust.
- 500 grams cream cheese: The creamy superstar that gives the cheesecake its luscious, smooth texture.
- 150 grams pistachio spread: Bursting with nutty flavor, this enriches the filling with classic pistachio goodness.
- 100 grams powdered sugar: Adds just the right touch of sweetness to balance the nuts and cream cheese.
- 200 grams heavy whipping cream (35%): Whipped to soft peaks, this lightens the filling and makes it wonderfully airy.
- 100 grams pistachio spread (for topping): For that final glossy, flavorful layer that delivers a beautiful presentation.
- Strawberries: Fresh and bright, these add a pop of color and refreshing contrast to the rich pistachio.
How to Make No-Bake Pistachio Cheesecake Recipe
Step 1: Prepare the Biscuit Crust
To start, crush your biscuits finely using a food processor, blender, or even a sturdy rolling pin—it’s satisfying work! Melt the butter and pour it over the crushed biscuits, mixing until the crumbs have a wet sand texture. This buttery base will set firm while giving your cheesecake that perfect crispy bite.
Step 2: Press and Freeze the Crust
Lightly grease your pan to prevent sticking, then press the biscuit mixture firmly and evenly across the bottom and just up the sides. This step is crucial for a sturdy base. Once shaped, pop it in the freezer to firm up so it holds together perfectly when the creamy filling goes on top.
Step 3: Make the Creamy Pistachio Filling
In a bowl, blend the room-temperature cream cheese with the pistachio spread until smooth and velvety. No lumps here—just silky pistachio goodness waiting to happen!
Step 4: Whip the Heavy Cream
In a chilled bowl, combine the heavy whipping cream with powdered sugar, then whip until soft peaks form. Be careful not to over-whip; this ensures your filling remains light and fluffy.
Step 5: Fold the Whipped Cream into the Cheesecake Mixture
Gently fold the whipped cream into the cream cheese and pistachio mixture in thirds. This step is all about preserving airiness for that melt-in-your-mouth feel. A light, fluffy filling will set beautifully in the fridge.
Step 6: Chill the Cheesecake to Set
Pour the filling into your chilled crust, smoothing the top evenly with a spoon. Cover the pan tightly to keep everything fresh, then refrigerate for at least 8 hours or overnight to allow the flavors to meld and the cheesecake to firm up perfectly.
Step 7: Garnish and Finish
Once set, drizzle the remaining pistachio spread over the top, tilting the pan for an even coat. Add some sliced fresh strawberries or a sprinkle of crushed pistachios to complete the look and add layers of texture and flavor.
How to Serve No-Bake Pistachio Cheesecake Recipe
Garnishes
For an elegant touch, fresh strawberry slices add brightness and a lovely color contrast, while crushed pistachios bring extra crunch and reinforce that signature pistachio flavor. A light dusting of powdered sugar can also add a pretty, snowy effect.
Side Dishes
This cheesecake pairs beautifully with a cup of espresso or a light, fruity tea. Fresh fruit salads or a scoop of vanilla ice cream beside it can also enhance the dessert experience without overpowering the delicate pistachio notes.
Creative Ways to Present
Try serving individual portions in clear glass jars or pretty dessert cups for a charming, personal touch. Alternatively, layer the crust and filling with crushed pistachios between layers for a festive pistachio parfait vibe. No matter the presentation, this cake is sure to wow!
Make Ahead and Storage
Storing Leftovers
Keep your No-Bake Pistachio Cheesecake refrigerated in an airtight container or wrapped tightly with plastic wrap to maintain its freshness and texture. Properly stored, it lasts for 3-4 days, retaining that creamy, nutty magic.
Freezing
If you want to store it longer, wrap the cheesecake securely in plastic wrap and aluminum foil, then freeze it. It can be frozen for up to one month. When ready to eat, thaw it overnight in the refrigerator for best results.
Reheating
This cheesecake is best enjoyed chilled and is not intended for reheating. Serving it cold keeps its creamy texture and rich pistachio flavor intact for the perfect bite every time.
FAQs
Can I use a different type of nut spread instead of pistachio?
Absolutely! While pistachio spread provides a unique and rich flavor, you can substitute with almond or hazelnut spread for a different but equally delicious twist on this cheesecake.
How long should I chill the cheesecake for the best texture?
Chilling for at least 8 hours or overnight is essential. This allows the filling to set properly and the flavors to fully develop, giving you that perfect creamy yet firm texture.
What type of biscuits work best for the crust?
Digestive biscuits or graham crackers are ideal because they crumble easily and offer a mild sweetness that complements the pistachio filling beautifully.
Can I make this cheesecake vegan or dairy-free?
While this recipe isn’t designed for vegan diets, you can experiment with dairy-free cream cheese alternatives and coconut cream to mimic the texture, though the flavor will vary a bit from the classic version.
Is it possible to double the recipe for a larger crowd?
Yes, just double all ingredients and use a larger pan or multiple pans. Make sure to adjust chilling time as thicker layers may take a bit longer to set.
Final Thoughts
There’s something truly special about this No-Bake Pistachio Cheesecake Recipe—it’s creamy, nutty, and utterly delightful without requiring any oven time. Whether you’re new to cheesecake making or a seasoned pro, this recipe guarantees smiles and satisfied taste buds. So why not dive in and treat yourself to a slice of this gorgeous, silky dessert soon?
Print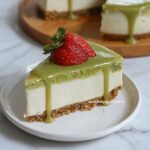
No-Bake Pistachio Cheesecake Recipe
- Prep Time: 20 minutes
- Cook Time: 0 minutes
- Total Time: 8 hours 20 minutes
- Yield: 8 servings
- Category: Dessert
- Method: No-Cook
- Cuisine: American
- Diet: Vegetarian
Description
Enjoy a luscious No-Bake Pistachio Cheesecake with a buttery biscuit crust and a creamy, airy pistachio filling. This easy-to-make dessert requires no oven and sets beautifully in the refrigerator, topped with a smooth pistachio spread and fresh strawberries for an elegant finish.
Ingredients
Biscuit Crust
- 200 grams biscuits
- 45 grams melted butter
Pistachio Cheesecake Filling
- 500 grams cream cheese (room temperature)
- 150 grams pistachio spread
- 100 grams powdered sugar
- 200 grams heavy whipping cream (35%)
Topping
- 100 grams pistachio spread
- Fresh strawberries, for garnish
Instructions
- Prepare the Biscuit Crust: Crush the biscuits finely using a food processor, blender, or rolling pin until they resemble fine crumbs. Melt the butter either in the microwave or on the stovetop, then mix it thoroughly with the biscuit crumbs until the mixture looks like wet sand, ensuring all crumbs are evenly coated.
- Press the Crust into the Pan and Freeze: Lightly grease a cheesecake pan for easy removal. Press the biscuit and butter mixture firmly into the bottom and slightly up the sides of the pan to form an even crust. Place the pan in the freezer to allow the crust to firm up while preparing the filling.
- Make the Pistachio Cheesecake Filling: In a clean bowl, combine the room-temperature cream cheese and 150 grams of pistachio spread. Mix thoroughly until the mixture is smooth and free of lumps, creating a creamy base for your cheesecake.
- Whip the Heavy Cream: Using a clean, dry, and cold bowl, whip the heavy cream together with the powdered sugar until soft peaks form. Be careful not to over-whip, as the cream will continue to firm up when folded into the cheesecake mixture.
- Fold in the Whipped Cream: Gently fold the whipped cream into the cream cheese and pistachio mixture in three parts. Use gentle folding techniques to maintain the airy texture and avoid deflating the filling, ensuring a light and fluffy cheesecake mixture.
- Assemble and Chill: Pour the pistachio cheesecake filling into the chilled crust and smooth the surface with a spoon. Cover the pan with plastic wrap or a tray and refrigerate for at least 8 hours or overnight to allow the cheesecake to set completely and flavors to meld.
- Garnish and Serve: Once set, warm the remaining 100 grams of pistachio spread slightly and pour it evenly over the cheesecake’s surface by tilting the pan. Garnish with fresh strawberries or crushed pistachios as desired. Slice and serve this creamy, indulgent no-bake pistachio cheesecake.
Notes
- For best results, use full-fat cream cheese and heavy cream to ensure a rich texture.
- Make sure the cream cheese is at room temperature before mixing for a smooth filling.
- Do not over-whip the heavy cream to prevent curdling and maintain a light texture.
- Allow the cheesecake to chill overnight if possible for optimal flavor and firmness.
- Use a springform pan or any pan with removable sides for easier cheesecake removal.
- Fresh strawberries add a nice tart contrast but can be replaced with any seasonal fruit or left out.

