
If you crave a dreamy dessert that combines smooth, creamy textures with the warm, caramelized spice of Biscoff cookies, then this No-Bake Mini Biscoff Cheesecakes Recipe is your new best friend. These delightful little treats are perfectly portioned, effortlessly assembled without any oven fuss, and deliver that irresistible flavor punch we all adore. Whether it’s a casual get-together or a sweet end to a cozy night, these mini cheesecakes bring joy in every bite and make indulgence feel wonderfully easy.
Ingredients You’ll Need
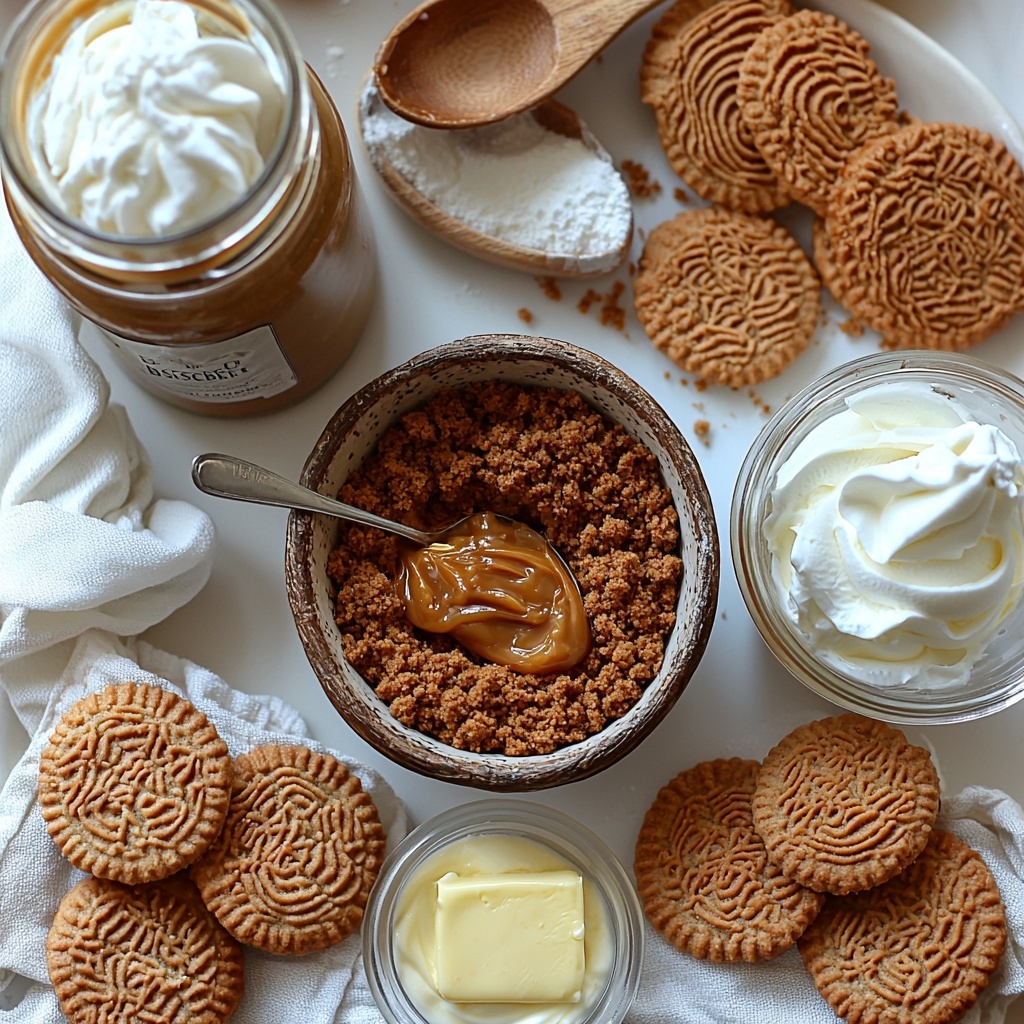
This No-Bake Mini Biscoff Cheesecakes Recipe comes to life with a handful of simple, well-chosen ingredients. Each one plays an essential role: from the crunchy, spiced cookie crumbs that create the base to the luscious blend of cream cheese and Biscoff spread that forms the silky filling. The balance here is key, and it’s amazing how just a few staples can craft such a luxurious dessert.
- Biscoff cookie crumbs (1.5 cups): These crumbs give the crust its signature caramelized crunch and spiced undertone.
- Unsalted butter (5 tbsp): Melted butter binds the crumbs together, creating a sturdy and flavorful base.
- Cream cheese (16 oz): For rich, creamy texture and tangy depth that complements the sweetness perfectly.
- Biscoff spread (1 cup + 0.5 cup): The star ingredient adding that intense cookie butter flavor, one part folded into the filling and one part melted as a finishing glaze.
- Powdered sugar (0.5 cup): Adds just the right amount of sweetness to balance the tanginess of the cream cheese.
- Vanilla extract (1 tsp): Enhances all the flavors with a warm, aromatic touch.
- Heavy cream (1 cup): Whipped to stiff peaks for a light, airy, and creamy filling.
- Whipped cream (1 cup): Used both inside the filling and as a topping, it adds extra creaminess and indulgence.
- Biscoff cookies (6): Crumbled on top for an irresistible crunch and pretty garnish.
How to Make No-Bake Mini Biscoff Cheesecakes Recipe
Step 1: Make the Crust
Start by crushing the Biscoff cookies until you have 1.5 cups of fine crumbs. Mix these crumbs with 5 tablespoons of melted unsalted butter until everything is evenly combined and looks beautifully sandy. Press the mixture firmly into the bottoms of paper-lined muffin tins. To set your crust and ensure it holds together during eating, pop the tray into the freezer for about 10 minutes. This little chill step is key for that perfect bite.
Step 2: Whip the Cream
While your crust chills, whip 1 cup of heavy cream until it forms stiff peaks. This means when you lift your beaters, the cream holds its shape firmly without drooping. Whipping it just right adds a luscious, airy texture to the cheesecake filling that balances the richness of the cream cheese beautifully. Set this whipped cream aside for now—it will be folded in later.
Step 3: Prepare the Filling
Combine all the creamy goodness in one bowl: softened cream cheese, 1 cup of Biscoff spread, 0.5 cup of powdered sugar, and 1 teaspoon of vanilla extract. Beat these together until the mixture is perfectly smooth and streak-free. Once you have that luscious base, gently fold in the whipped cream you made earlier. The folding step is gentle but crucial—it keeps the filling light and fluffy without deflating the cream.
Step 4: Assemble and Chill
Now comes the fun part—spoon the cheesecake filling onto each crust with care, filling the muffin cups almost to the top. The uniform layers shine in these mini sizes, letting each bite deliver a perfect crust-to-filling ratio. Refrigerate them for at least 6 hours so the cheesecakes can set properly and develop their full flavor. Patience here is rewarded with pure indulgence.
Step 5: Add the Final Touches
Once chilled, melt 0.5 cup of additional Biscoff spread until smooth and warm. Spoon a little over each cheesecake for an extra glossy, flavorful finish. Top each mini cheesecake with a dollop of whipped cream and sprinkle with crumbled Biscoff cookies for that irresistible crunch and elegant presentation. These finishing touches elevate the dessert, making it truly special.
How to Serve No-Bake Mini Biscoff Cheesecakes Recipe
Garnishes
These mini cheesecakes look gorgeous with a few simple garnishes. Add a sprinkle of crushed Biscoff cookies or a drizzle of extra cookie butter on top for more texture and flavor. A few chocolate shavings, a dusting of cinnamon, or even a tiny mint leaf can add a fresh contrast. Each garnish amps up the visual appeal and creates inviting layers of taste you’ll love.
Side Dishes
While these mini cheesecakes are a treat all on their own, pairing them with fresh fruit—like sliced strawberries or tart raspberries—creates a bright counterbalance to their sweetness. A small scoop of vanilla ice cream or a cup of rich coffee complements the dessert perfectly for an indulgent finish to any meal or a satisfying snack anytime.
Creative Ways to Present
These No-Bake Mini Biscoff Cheesecakes Recipe desserts are naturally charming in muffin tin liners, but you can elevate presentation by serving them on a rustic wooden board or on pretty dessert plates topped with edible flowers. For a party, try layering them in clear mini jars or small glass cups to showcase the layers. Little touches like decorative spoons or fresh herbs add memorable charm.
Make Ahead and Storage
Storing Leftovers
One of the best things about this No-Bake Mini Biscoff Cheesecakes Recipe is how well they keep! Store any leftovers in an airtight container in the refrigerator for up to 4 days. Keeping them chilled helps maintain their creamy texture and prevents the crust from getting soggy.
Freezing
If you want to make these cheesecakes in advance or save extras for later, they freeze beautifully. Place the mini cheesecakes in a single layer on a baking sheet to freeze until firm, then transfer to a freezer-safe container with parchment paper between layers. They can be frozen for up to 2 months. Just thaw overnight in the refrigerator before enjoying.
Reheating
Since these are no-bake cheesecakes, reheating is not necessary or recommended. They are best enjoyed chilled or at room temperature. Simply take them out of the fridge 10-15 minutes before serving if you want the flavors to mellow and the texture to soften slightly.
FAQs
Can I use regular cookies instead of Biscoff cookies for the crust?
Absolutely! While Biscoff cookies provide a unique caramelized spice flavor, you can substitute with other spiced or ginger cookies for a different but still delicious twist.
Is it necessary to chill the cheesecakes for 6 hours?
Chilling for at least 6 hours helps the filling set properly and the flavors to meld. If you’re in a hurry, chilling for 4 hours might work, but longer is always better for the best texture.
Can I make this recipe dairy-free?
While the classic recipe uses cream cheese and heavy cream, you can experiment with dairy-free cream cheese and coconut cream to create a vegan-friendly alternative. Just note the flavor and texture will vary slightly.
Do I have to use whipped cream inside the filling?
Yes, the whipped cream lightens the dense cream cheese mixture giving the filling a fluffy, airy consistency that feels indulgent but not heavy.
What’s the best way to crush the Biscoff cookies?
Place the cookies in a sealed plastic bag and use a rolling pin to crush them into fine crumbs, or pulse them gently in a food processor for quick results without turning them into powder.
Final Thoughts
I cannot recommend this No-Bake Mini Biscoff Cheesecakes Recipe enough if you want to impress yourself or guests with minimal effort but maximum flavor. These mini beauties are creamy, flavorful, and visually charming, making them a perfect anytime treat. Go ahead, give this recipe a try—I promise it will become one of your go-to favorites!
Print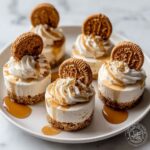
No-Bake Mini Biscoff Cheesecakes Recipe
- Prep Time: 30 minutes
- Cook Time: 0 minutes
- Total Time: 6 hours 30 minutes
- Yield: 12 mini cheesecakes
- Category: Dessert
- Method: No-Cook
- Cuisine: American
- Diet: Vegetarian
Description
These No-Bake Mini Biscoff Cheesecakes are a delightful treat combining the rich, creamy texture of cheesecake with the unique caramelized flavor of Biscoff cookies and spread. Perfect for a quick dessert without the need for an oven, they feature a buttery cookie crust topped with a luscious Biscoff cheesecake filling, finished with melted Biscoff spread, whipped cream, and cookie crumbles for an irresistible bite-sized indulgence.
Ingredients
Crust
- 1.5 cups Biscoff cookie crumbs
- 5 tbsp unsalted butter, melted
Filling
- 16 oz cream cheese, softened
- 1 cup Biscoff spread
- 0.5 cup powdered sugar
- 1 tsp vanilla extract
- 1 cup heavy cream
Topping
- 0.5 cup Biscoff spread (melted)
- 1 cup whipped cream
- 6 Biscoff cookies, crumbled
Instructions
- Prepare the Crust: Start by crushing up Biscoff cookies to get 1.5 cups of crumbs. Mix these crumbs with 5 tablespoons of melted unsalted butter in a medium bowl until fully combined. Line a muffin tin with paper liners and press the crumb mixture evenly into the bottoms of each liner. Freeze the crusts for about 10 minutes to help them set and harden properly.
- Whip the Cream: In a separate bowl, whip 1 cup of heavy cream until stiff peaks form. This means the cream will stand firmly when you lift the whisk or beater. Set this whipped cream aside for later use in the filling.
- Make the Cheesecake Filling: In a large mixing bowl, combine the softened 16 ounces of cream cheese, 1 cup of Biscoff spread, 0.5 cup powdered sugar, and 1 teaspoon vanilla extract. Beat this mixture until smooth and creamy. Then, gently fold the previously whipped cream into this blend to keep the filling light and fluffy.
- Assemble and Chill: Spoon the cheesecake filling over the prepared crusts in your muffin tin. Smooth out the tops and transfer the tin to the refrigerator. Chill the mini cheesecakes for at least 6 hours to allow them to fully set and develop flavor.
- Add the Toppings: Once the cheesecakes are set, melt an additional 0.5 cup of Biscoff spread until pourable. Spoon this over each cheesecake for a shiny, flavorful top layer. Finish by adding a dollop of whipped cream and sprinkling crumbled Biscoff cookie pieces over each mini cheesecake for added texture and decoration.
Notes
- Freezing the crust helps it hold its shape when adding the filling.
- Softened cream cheese ensures a smooth and lump-free filling.
- Whip the cream to stiff peaks carefully so it folds nicely into the cheesecake mixture for fluffiness.
- Chilling time is critical for the cheesecakes to set properly since they are no-bake.
- Use room temperature Biscoff spread when mixing into the filling for easier blending.
- Store mini cheesecakes in the refrigerator and consume within 3-4 days for best freshness.

