
“`html
If you love the comforting flavors of a cheeseburger but want something fresh, fun, and easier to eat, the Garlic Butter Beef Cheeseburger Rollups Recipe is exactly what you need in your life. These rollups combine juicy, seasoned ground beef with melty cheddar and mozzarella cheeses, wrapped up in soft flour tortillas, then brushed with garlicky butter to take every bite to the next level. Whether you’re feeding a hungry family or impressing guests at a casual get-together, this dish brings all the familiar goodness of a cheeseburger in a cozy, handheld roll-up that will have everyone asking for seconds.
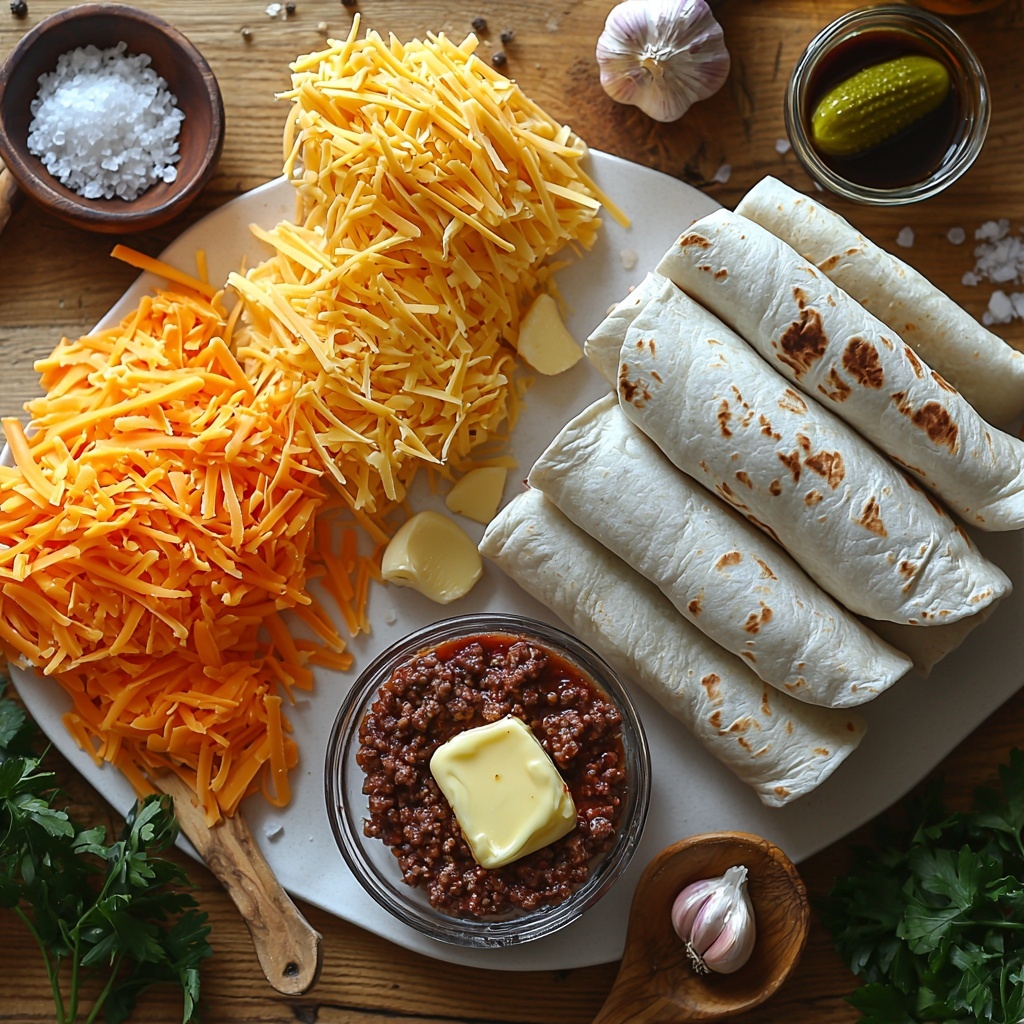
Ingredients You’ll Need
The magic of this Garlic Butter Beef Cheeseburger Rollups Recipe lies in its simplicity. Each ingredient plays a key role, whether it’s building the rich, meaty flavor or adding that gooey cheese pull we all crave. With just a handful of staples, you’ll come together a dish that’s bursting with flavor and perfect texture every time.
- 1 lb ground beef: The hearty base that brings juicy, savory flavor to every bite.
- ½ cup shredded cheddar cheese: Sharp and tangy, it adds classic cheeseburger richness.
- ½ cup shredded mozzarella cheese: Melts beautifully for that luscious, stringy texture.
- 1 tablespoon olive oil: Helps brown the beef perfectly while adding a subtle fruity note.
- 4 large flour tortillas: Soft and pliable, they wrap all the flavors together and keep things neat.
- ¼ cup butter, melted: The base for our garlic butter, providing richness and moisture.
- 3 cloves garlic, minced: Infuses the butter with aromatic warmth that elevates the rollups.
- 1 tablespoon Worcestershire sauce: Adds a deep umami complexity to the beef.
- 1 teaspoon onion powder: Enhances savory layers without overpowering.
- 1 teaspoon garlic powder: Gives an extra boost of garlicky goodness beyond the fresh garlic.
- ½ teaspoon smoked paprika: Imparts a subtle smoky flavor that rounds out the seasoning.
- Salt and black pepper, to taste: Essential finishing touches that bring out all the other flavors.
- Optional: sliced pickles for garnish: Adds a tangy crunch to brighten each bite.
How to Make Garlic Butter Beef Cheeseburger Rollups Recipe
Step 1: Preheat the Oven
Start by setting your oven to 375°F (190°C). Line a baking sheet with parchment paper or lightly grease it to prevent sticking later on. This simple prep ensures your rollups bake evenly and come out with a beautiful golden crust.
Step 2: Cook the Beef
Heat the olive oil in a skillet over medium-high heat, then add the ground beef. Break it up with a spatula as it cooks, stirring occasionally until it’s fully browned and fragrant—about 7 to 8 minutes. This step is crucial to build that perfect savory foundation.
Step 3: Season the Beef
Once the beef is browned, stir in Worcestershire sauce, onion powder, garlic powder, smoked paprika, salt, and black pepper. Mixing well lets all those bold flavors meld together. Remove from heat and let the mixture cool slightly so it’s easier to handle as you assemble.
Step 4: Prepare the Garlic Butter
In a small bowl, combine the melted butter with the minced garlic. Stir thoroughly to infuse the butter with that rich, pungent garlic aroma that will turn these rollups into pure decadence.
Step 5: Assemble the Rollups
Lay each large flour tortilla flat on your workspace. Distribute the seasoned beef evenly over the tortillas, then top generously with shredded cheddar and mozzarella cheese. This layering guarantees each bite will be loaded with melty, cheesy goodness.
Step 6: Roll and Bake
Carefully roll each tortilla tightly, tucking in the sides to keep the filling secure. Place each rollup seam-side down on the prepared baking sheet. Brush the tops liberally with the garlic butter, then pop them in the oven for 12 to 15 minutes. When they emerge golden, bubbly, and irresistible, you’ll know they’re ready.
Step 7: Serve and Enjoy
Allow the rollups to cool for a few minutes before slicing into pinwheels if you like. Garnish with a few sliced pickles for that classic cheeseburger tang. Now it’s time to dig in and enjoy the perfect harmony of flavors and textures!
How to Serve Garlic Butter Beef Cheeseburger Rollups Recipe
Garnishes
While the optional sliced pickles add a delightful crunch and tang that cut through the richness, a sprinkle of fresh chopped parsley or a drizzle of ketchup or mustard can also create a pop of color and a flavor nod to traditional cheeseburgers. Don’t be shy about garnishing — it makes your presentation as exciting as the taste.
Side Dishes
To complement the rollups, consider classic sides like crispy French fries or a fresh, tangy coleslaw to offer contrasting textures. A simple garden salad with a light vinaigrette can keep things balanced and fresh. These sides make the meal feel complete and crowd-pleasing.
Creative Ways to Present
For a party or casual gathering, slice the rollups into bite-sized pinwheels and serve them on a platter with small dipping bowls of ketchup, mustard, or even a spicy mayo. These bite-sized versions not only look impressive but also keep the meal fun and interactive.
Make Ahead and Storage
Storing Leftovers
If you happen to have any leftovers (which might be rare!), store them in an airtight container in the refrigerator for 3 to 4 days. This will keep the rollups fresh and flavorful while maintaining a satisfying texture.
Freezing
You can freeze the assembled rollups before baking by wrapping them tightly in plastic wrap and placing them in a freezer bag. They’ll keep well for up to 2 months. Just thaw them in the fridge overnight before baking as directed.
Reheating
To reheat, place rollups on a baking sheet and warm them in a 350°F (175°C) oven for about 10 minutes or until heated through and the cheese is melty again. This prevents sogginess and brings back that fresh-from-the-oven crispness.
FAQs
Can I use a different type of cheese?
Absolutely! While cheddar and mozzarella are classic for that cheeseburger flavor and melty texture, feel free to try pepper jack for a spicy kick or Swiss for a nuttier taste. Just be sure to use shredded cheese so it melts evenly.
Is there a vegetarian version of the Garlic Butter Beef Cheeseburger Rollups Recipe?
Yes, you can swap the ground beef for plant-based crumbles or sautéed mushrooms seasoned similarly. The garlic butter and cheeses will still shine, making it delicious for vegetarians too.
Can these rollups be made ahead of time?
Definitely! You can assemble the rollups a few hours ahead and refrigerate them until you’re ready to bake. Just make sure to brush with garlic butter right before baking to keep that fresh garlicky flavor.
What if I don’t have Worcestershire sauce?
If Worcestershire sauce isn’t on hand, you can substitute it with soy sauce or a splash of balsamic vinegar combined with a pinch of sugar to mimic the sweet umami profile it provides.
How spicy are these rollups?
The smoky paprika adds a gentle smoky note rather than heat, so the rollups are not spicy unless you add extra chili flakes or hot sauce. They’re great for all palates, especially kids.
Final Thoughts
Once you try this Garlic Butter Beef Cheeseburger Rollups Recipe, it will quickly become a go-to weeknight dinner or a party hit. The fusion of savory beef, gooey cheeses, and rich garlic butter wrapped in soft tortillas is comfort food at its finest. Give it a whirl—you won’t regret the warm smiles and full stomachs these rollups bring to your table!
“`
Print
Garlic Butter Beef Cheeseburger Rollups Recipe
- Prep Time: 10 minutes
- Cook Time: 20 minutes
- Total Time: 30 minutes
- Yield: 4 servings
- Category: Main Course
- Method: Baking
- Cuisine: American
Description
Delicious and easy Garlic Butter Beef Cheeseburger Rollups featuring seasoned ground beef and melted cheddar and mozzarella cheeses wrapped in soft flour tortillas, brushed with garlic butter, and baked to golden perfection. A perfect weeknight meal or appetizer that combines the flavors of a cheeseburger in a convenient rollup form.
Ingredients
Filling
- 1 lb ground beef
- 1 tablespoon olive oil
- 1 tablespoon Worcestershire sauce
- 1 teaspoon onion powder
- 1 teaspoon garlic powder
- ½ teaspoon smoked paprika
- Salt and black pepper, to taste
Cheese
- ½ cup shredded cheddar cheese
- ½ cup shredded mozzarella cheese
Rollup and Topping
- 4 large flour tortillas
- ¼ cup butter, melted
- 3 cloves garlic, minced
- Optional: sliced pickles for garnish
Instructions
- Preheat the Oven: Set your oven to 375°F (190°C). Line a baking sheet with parchment paper or lightly grease it to prepare for baking the rollups.
- Cook the Beef: Heat olive oil in a large skillet over medium-high heat. Add the ground beef and cook until browned, breaking it up with a spatula, about 7–8 minutes.
- Season the Beef: Stir in Worcestershire sauce, onion powder, garlic powder, smoked paprika, salt, and black pepper. Mix well and remove from heat. Allow the beef mixture to cool slightly to avoid excess moisture in the tortillas.
- Prepare the Garlic Butter: In a small bowl, combine melted butter with minced garlic. Stir well and set aside for brushing over the rollups.
- Assemble the Rollups: Lay the tortillas flat on a clean surface. Evenly distribute the beef mixture over each tortilla, then sprinkle the shredded cheddar and mozzarella cheese on top.
- Roll and Bake: Roll each tortilla tightly, tucking in the sides to secure the filling. Place them seam-side down on the prepared baking sheet. Brush generously with the garlic butter mixture to add rich flavor and enhance browning. Bake for 12–15 minutes, until the roll-ups are golden and the cheese inside is melted and bubbly.
- Serve: Allow rollups to cool slightly before slicing into pinwheels if desired. Garnish with sliced pickles and serve warm for the best flavor experience.
Notes
- To avoid soggy tortillas, ensure the beef mixture is not too wet before assembling.
- Use a sharp knife to slice the rollups into pinwheels for clean cuts.
- Customize by adding other burger toppings like cooked bacon, diced onions, or jalapeños inside the rollups.
- For a gluten-free option, substitute flour tortillas with gluten-free tortillas.
- Store leftovers in an airtight container in the refrigerator for up to 3 days and reheat in the oven for best results.


