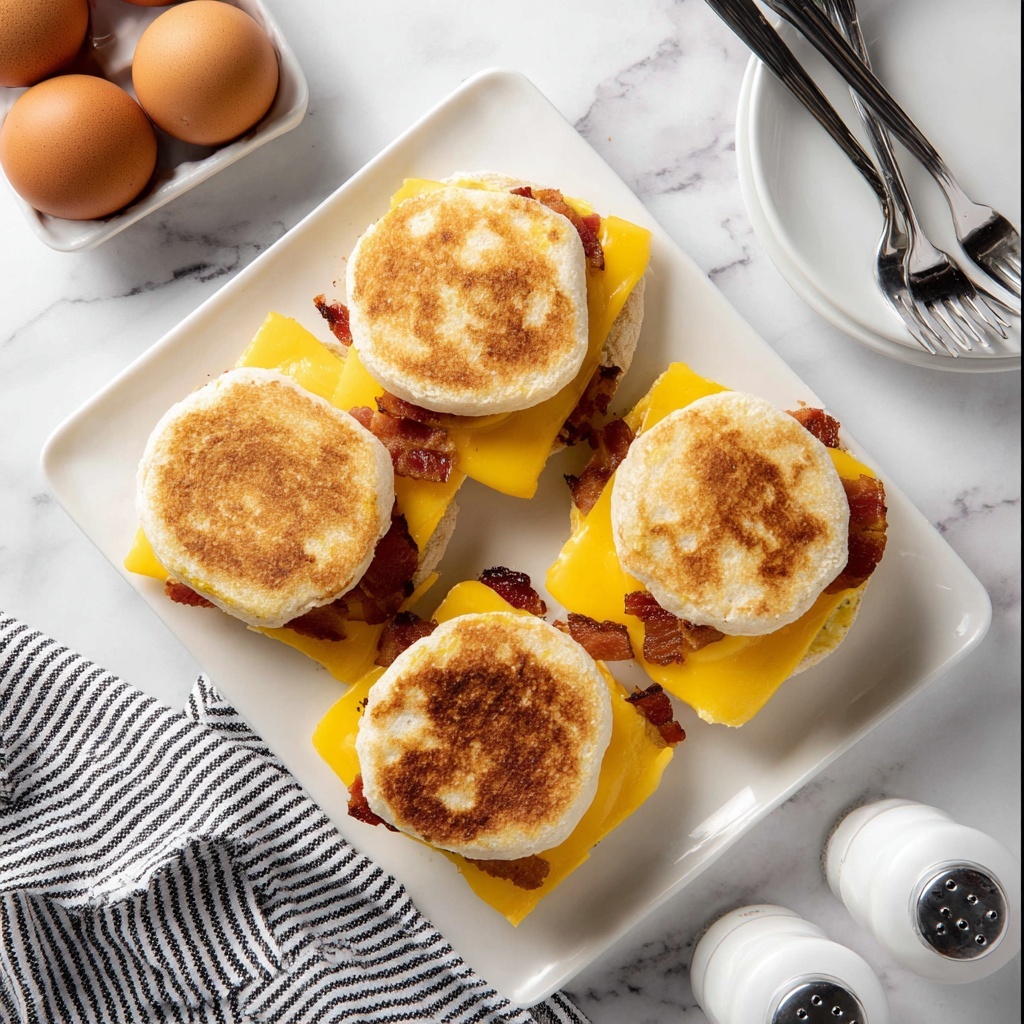
If you’ve ever wished for a quick, delicious breakfast that you can grab and go without any fuss, you’re going to absolutely love this Freezer Breakfast Sandwiches Recipe. It’s perfect for busy mornings when you need something hearty and satisfying but don’t have the time to cook from scratch. These sandwiches combine the perfect balance of fluffy eggs, savory bacon or sausage, melted cheese, and toasted English muffins — all wrapped up and ready to pop in your freezer. When you’re pressed for time, just heat one up, and you’ve got an easy, homemade breakfast that feels indulgent and fresh every time.

Ingredients You’ll Need
The ingredients for this recipe are simple yet essential, each playing a key role in creating the perfect combination of flavors, textures, and colors in your Freezer Breakfast Sandwiches. These staples are accessible, straightforward, and come together beautifully for a satisfying result.
- English muffins: Provide a sturdy but soft base that crisps wonderfully when toasted or reheated, holding all your sandwich ingredients together.
- Large eggs: The star of the show, giving your sandwich protein and that rich, creamy texture you crave in morning meals.
- Bacon: Adds a smoky crunch and a salty punch that pairs perfectly with the eggs and cheese.
- Sausage patties: A juicy, flavorful alternative to bacon, offering a deliciously hearty bite.
- Slices of cheese: Melted to gooey perfection, cheese ties everything together and adds a luscious, creamy note.
- Salt and pepper: Simple seasonings that elevate the eggs and bring out the full flavor of every ingredient.
- Butter or cooking spray: Used for greasing the pan so your eggs cook evenly and don’t stick.
How to Make Freezer Breakfast Sandwiches Recipe
Step 1: Cook the Bacon
Start by frying the bacon slices in a skillet over medium heat until they become crispy and golden. This step is crucial because crispy bacon adds the perfect texture contrast to your sandwiches. Once cooked, transfer them to paper towels to drain the excess grease and keep that lovely crunch intact.
Step 2: Prepare the Sausage Patties
Using the same skillet, cook your sausage patties thoroughly until they reach a juicy, rich brown color. Draining them on paper towels is important here too, so your sandwiches don’t end up greasy but stay packed with flavor.
Step 3: Cook the Eggs
Heat a non-stick pan or use egg rings to shape your eggs perfectly. Grease the pan lightly with butter or cooking spray, crack each egg into the rings, and season with salt and pepper. Cook until the egg whites are set and the yolks reach your preferred firmness. For firmer yolks, flip the eggs carefully and cook a little longer.
Step 4: Assemble the Sandwiches
Lay the bottom halves of your English muffins on a clean surface, add a slice of cheese to each, then top half with a cooked egg. For three sandwiches, add two crispy bacon halves on top of the egg, and for the other three, place a sausage patty instead. Finish with the muffin tops to close each sandwich.
Step 5: Wrap and Freeze
Wrap each sandwich tightly in parchment paper to prevent freezer burn and maintain freshness. Place the wrapped sandwiches in ziplock bags or an airtight container, labeling with the date for reference, and freeze for up to three months. This method makes your mornings effortlessly delicious for weeks to come.
How to Serve Freezer Breakfast Sandwiches Recipe
Garnishes
When you’re ready to enjoy your sandwich, adding fresh garnishes can really elevate the experience. Try topping with a little fresh tomato slice, a spread of avocado, or even a sprinkle of chopped chives or parsley. These simple touches bring brightness and an inviting pop of color.
Side Dishes
A Freezer Breakfast Sandwiches Recipe is perfect on its own, but pairing it with fresh fruit like berries or a crisp green salad can make your breakfast a little more balanced and refreshing. For a heartier meal, crispy breakfast potatoes or a cup of steamed vegetables can add great texture and nutrition.
Creative Ways to Present
For a fun twist, try slicing your sandwich diagonally and serving it open-faced with the melted cheese peeking out. You can also cut sandwiches into smaller bite-sized pieces for brunch gatherings, making them easy to share while keeping everyone happy and fueled.
Make Ahead and Storage
Storing Leftovers
If you happen to have any sandwiches leftover before freezing, it’s best to store them wrapped tightly in the fridge for up to 2 days. This keeps them fresh yet ready to be warmed up quickly when needed.
Freezing
This recipe shines as a freezer-friendly meal. After wrapping each sandwich carefully, freeze them flat in bags or containers to save space. They keep wonderfully for up to three months without losing any of their flavor or texture, giving you a reliable breakfast option no matter how hectic your mornings get.
Reheating
To reheat, simply unwrap the sandwich from its parchment paper, then wrap it in a paper towel and microwave on high for 1 to 2 minutes until warmed through. Alternatively, if you prefer a crispier texture, reheating in a preheated oven at 350°F (175°C) for about 20 minutes works beautifully to bring back that fresh-from-the-kitchen taste.
FAQs
Can I customize the meats in this Freezer Breakfast Sandwiches Recipe?
Absolutely! Feel free to swap bacon or sausage with ham, turkey bacon, or your favorite breakfast meat. You can even go vegetarian by using veggie patties or sautéed mushrooms for a delicious twist.
How long can I keep these sandwiches in the freezer?
These sandwiches stay tasty and safe to eat for up to three months when properly wrapped and stored in the freezer. Beyond that, they might lose quality and flavor.
Is it possible to make this recipe dairy-free?
Yes! Just omit the cheese or use a dairy-free cheese substitute. It won’t compromise the flavors much, and you’ll still have a hearty, satisfying sandwich.
Can I prepare these sandwiches in advance without freezing?
You can prepare them and store them in the refrigerator for up to 2 days, but freezing is recommended for longer storage and to maintain freshness.
What’s the best way to prevent sogginess when reheating?
Wrapping the sandwich in parchment paper and using a paper towel in the microwave helps absorb moisture. Additionally, reheating in the oven often keeps the muffin crispier than microwaving alone.
Final Thoughts
Making your mornings easier and tastier is just a few simple steps away with this Freezer Breakfast Sandwiches Recipe. Whether you’re pressed for time or just love having something homemade and delicious ready to go, this recipe is a true lifesaver. The combination of flavors, textures, and convenience will keep you coming back for more, so don’t hesitate—give it a try and enjoy the perfect breakfast any day of the week!
Print
Freezer Breakfast Sandwiches Recipe
- Prep Time: 15 minutes
- Cook Time: 25 minutes
- Total Time: 40 minutes
- Yield: 6 sandwiches
- Category: Breakfast
- Method: Frying
- Cuisine: American
Description
These Freezer Breakfast Sandwiches are a convenient and delicious make-ahead meal perfect for busy mornings. Featuring crispy bacon, savory sausage patties, fluffy eggs, melted cheese, and toasted English muffins, these sandwiches can be assembled in just 40 minutes, frozen for up to 3 months, and quickly reheated to enjoy a hearty breakfast on the go.
Ingredients
Breakfast Sandwiches
- 6 English muffins, cut in half
- 6 large eggs
- 3 slices of bacon, cut in half (6 halves)
- 3 sausage patties
- 6 slices of cheese (your choice, e.g., cheddar or American)
- Salt and pepper, to taste
- Butter or cooking spray (for greasing the pan)
Instructions
- Cook the Bacon: In a skillet over medium heat, cook the bacon slices until crispy. Remove the bacon from the skillet and drain on paper towels to remove excess grease. Set aside.
- Cook the Sausage Patties: Using the same skillet, cook the sausage patties over medium heat until fully cooked through and browned. Remove and drain on paper towels. Set aside.
- Cook the Eggs: Heat a small non-stick pan or use a pan fitted with 4 egg rings over medium heat. Lightly grease with butter or cooking spray. Crack one egg into each ring and season with salt and pepper.
- Finish the Eggs: Cook the eggs until the whites are set and yolks reach your preferred doneness, approximately 3-4 minutes for runny yolks. For firmer yolks, carefully flip and cook for an additional 1-2 minutes. Remove eggs gently and let cool slightly.
- Assemble the Sandwiches: Place the bottom halves of the English muffins on a clean surface. Add a slice of cheese on each. For half of the sandwiches (3), layer with one egg and two halves of bacon. For the remaining 3 sandwiches, layer with one egg and one sausage patty. Top each stack with the top half of the English muffin.
- Wrap for Freezing: Wrap each sandwich individually in parchment paper. Place the wrapped sandwiches in ziplock bags or airtight containers. Label and store them in the freezer for up to 3 months.
- Reheat and Serve: To reheat, unwrap the sandwich from the parchment paper and wrap it in a paper towel. Microwave on high for 1-2 minutes until heated through. Alternatively, preheat your oven to 350°F (175°C) and bake the wrapped sandwich for about 20 minutes until warm throughout.
Notes
- For easier assembly, let the cooked eggs cool slightly before placing them on the muffins to prevent sogginess.
- You can customize sandwiches with different cheese types or add veggies like spinach or tomato slices before freezing.
- To save time, cook bacon and sausage patties the day before or in advance and refrigerate until ready to assemble.
- To crisp up the English muffins before assembling, you can toast them lightly.
- The sandwiches freeze well for up to 3 months; after thawing, consume within 1-2 days for best quality.


