
If you’re looking to treat yourself or impress guests with a dessert that’s both rich and beautifully textured, this Decadent Chocolate Mousse Brownies Recipe is the one to try. It masterfully combines the fudgy goodness of classic brownies with the silky smoothness of chocolate mousse, creating layers of indulgence in every bite. Whether it’s a special occasion or just a cozy night in, these brownies are pure chocolate bliss that will keep everyone coming back for more.

Ingredients You’ll Need
Getting the ingredients right is the foundation for the perfect batch of these luxurious brownies. Each component is simple but plays a crucial role in delivering that unforgettable taste and texture, from rich cocoa to the creamy mousse topping.
- ½ cup unsalted butter: Adds moisture and richness, creating that melt-in-your-mouth brownie base.
- 8 ounces bittersweet or semi-sweet chocolate: Provides deep chocolate flavor for both the brownie base and mousse topping.
- 1 cup granulated sugar: Sweetens the batter perfectly without overpowering the chocolate.
- 2 large eggs: Help bind the ingredients and add structure to the brownies.
- 1 teaspoon vanilla extract: Enhances the chocolate’s natural flavor with a warm, aromatic note.
- ½ cup all-purpose flour: Gives the brownies their classic, soft crumb.
- ¼ cup unsweetened cocoa powder: Intensifies chocolate flavor and adds a beautiful dark color.
- 1 cup heavy cream: Whipped into the mousse for a light, airy contrast on top of the brownies.
How to Make Decadent Chocolate Mousse Brownies Recipe
Step 1: Prepare Your Baking Pan
Start by preheating your oven to 350°F (175°C). This ensures even baking right from the start. Grease a 9×9-inch pan or line it with parchment paper, which not only prevents sticking but makes cleanup easier after you’ve enjoyed every bite.
Step 2: Melt Butter and Chocolate
On low heat, gently melt the butter with the bittersweet or semi-sweet chocolate. Stir constantly to get a smooth, glossy mixture full of deep chocolate aroma. Once melted, remove it from heat and allow it to cool slightly, so it won’t cook the eggs when added later.
Step 3: Combine Sugar, Eggs, and Chocolate
In a large bowl, whisk together sugar and eggs until fully combined and slightly thickened. Adding the cooled chocolate mixture here infuses the batter with intense cocoa richness. Stir in vanilla extract to round out the flavors beautifully.
Step 4: Fold in Dry Ingredients
Gently add the flour and cocoa powder to the wet mixture, folding carefully to maintain the batter’s lightness. Overmixing can toughen brownies, so go slow and stop as soon as you see no more streaks of flour. Pour this luscious batter into your prepared pan and smooth it out evenly.
Step 5: Bake the Brownie Base
The baking takes 20-25 minutes until the edges are set but the center stays slightly gooey. A toothpick inserted should come out with a few moist crumbs. When done, let the brownies cool in the pan—it’s essential so the mousse layer sits perfectly without melting.
Step 6: Melt Chocolate for Mousse
Using a double boiler, slowly melt another 8 ounces of bittersweet chocolate until silky smooth. This controlled heat method ensures the chocolate won’t burn while achieving the ideal consistency for folding into whipped cream.
Step 7: Whip the Cream and Combine
Whip 1 cup of heavy cream to soft peaks, lightening the dense chocolate. Gently fold the slightly cooled melted chocolate into the whipped cream for a perfectly airy mousse texture that’s rich but not heavy.
Step 8: Assemble and Chill
Spread the mousse evenly over your cooled brownie base. Refrigerate for at least 2 hours to let the mousse set into a luxurious, velvety layer that’s irresistible. This chilling step also brings the flavors together beautifully.
Step 9: Slice and Enjoy
Once chilled, slice the brownies into 16 squares. They’re ready to serve as is or with your favorite toppings. This final step is where you get to personalize your creation and wow your friends or family.
How to Serve Decadent Chocolate Mousse Brownies Recipe
Garnishes
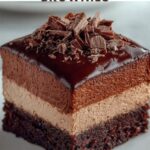
Simple garnishes can elevate the experience. Try shaving some dark chocolate over the top, adding a dollop of whipped cream, or sprinkle fresh berries like raspberries or strawberries. These touches add color, texture, and a hint of freshness that balances the richness wonderfully.
Side Dishes
If you want to create a full dessert spread, serve these brownies with a scoop of vanilla ice cream or a drizzle of caramel sauce. A cup of rich espresso or bold red wine also pairs exceptionally well, complementing the chocolate’s depth perfectly.
Creative Ways to Present
Consider serving your Decadent Chocolate Mousse Brownies Recipe in individual portions using mason jars or small glasses to show off the layers. You can also dust the top with cocoa powder or edible gold flakes for a fancy touch that impresses at dinner parties or special occasions.
Make Ahead and Storage
Storing Leftovers
Store leftover brownies covered in the refrigerator; the mousse layer keeps beautifully chilled and fresh for up to 4 days. This dessert’s flavors actually get more intense after a day or two, so you and your family are in for a real treat if you delay enjoying them all immediately.
Freezing
You can freeze these brownies for up to 2 months. Wrap individual squares tightly in plastic wrap and then place them in an airtight container. When ready to enjoy, thaw in the refrigerator overnight to keep the mousse texture flawless.
Reheating
Since this dessert’s star is the chilled mousse, reheating isn’t recommended. Instead, bring the brownies to room temperature for a few minutes if they feel too cold, allowing the mousse to soften slightly without melting or losing its creamy structure.
FAQs
Can I use milk chocolate instead of bittersweet?
Absolutely! Milk chocolate will make the brownies sweeter and less intense, perfect if you prefer a milder chocolate flavor. Just be mindful it might slightly affect the mousse’s firmness.
Is it okay to substitute heavy cream with whipped topping?
Heavy cream is essential for the right texture and taste in the mousse topping. Whipped toppings don’t whip as firmly or taste as rich, so they won’t give the same decadent effect.
Can I make the mousse layer dairy-free?
Yes, substitute heavy cream with coconut cream or another non-dairy whipping cream. The flavor will be subtly different but still deliciously creamy.
How do I tell when the brownies are perfectly baked?
Look for set edges and a center that still has a few moist crumbs when tested with a toothpick. This ensures fudgy brownies that aren’t dry or overly cakey.
What if I don’t have a 9×9 pan?
A similar sized pan, like an 8×8 or 9×13, will work—just adjust baking time slightly and keep an eye on the brownies, as thickness changes with pan size.
Final Thoughts
If you want to experience a chocolate dessert that feels both luxurious and approachable, this Decadent Chocolate Mousse Brownies Recipe is your new best friend. It’s perfect for celebrations or simply treating yourself to something spectacular after a long day. Give it a try and savor every creamy, fudgy bite—you won’t regret it!
Print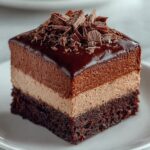
Decadent Chocolate Mousse Brownies Recipe
- Prep Time: 30 minutes
- Cook Time: 25 minutes
- Total Time: 2 hours 55 minutes
- Yield: 16 servings
- Category: Dessert
- Method: Baking
- Cuisine: American
Description
Indulge in these decadent Chocolate Mousse Brownies featuring a rich, fudgy brownie base topped with a smooth, airy chocolate mousse. Perfect for chocolate lovers looking for a luscious dessert that combines two classic textures in one irresistible treat.
Ingredients
Brownie Base
- ½ cup unsalted butter
- 8 ounces bittersweet or semi-sweet chocolate
- 1 cup granulated sugar
- 2 large eggs
- 1 teaspoon vanilla extract
- ½ cup all-purpose flour
- ¼ cup unsweetened cocoa powder
Chocolate Mousse Topping
- 8 ounces bittersweet chocolate, chopped
- 1 cup heavy cream
Instructions
- Preheat and Prepare Pan: Preheat your oven to 350°F (175°C). Grease a 9×9-inch baking pan or line it with parchment paper to prevent sticking and make removal easier.
- Melt Butter and Chocolate: In a medium saucepan over low heat, melt ½ cup of unsalted butter together with 8 ounces of bittersweet or semi-sweet chocolate, stirring continuously until smooth and fully combined. Remove from heat and allow to cool slightly to prevent cooking the eggs when added.
- Mix Sugar and Eggs: In a large mixing bowl, whisk together 1 cup of granulated sugar and 2 large eggs until the mixture is combined and slightly frothy, which will help give structure to the brownies.
- Combine Wet Ingredients: Add the cooled melted chocolate and butter mixture to the sugar and eggs, then stir in 1 teaspoon of vanilla extract. Mix until smooth and well incorporated.
- Add Dry Ingredients: Gently fold in ½ cup of all-purpose flour and ¼ cup of unsweetened cocoa powder just until no streaks remain. Avoid overmixing to keep the brownies tender and fudgy.
- Bake the Brownie Base: Pour the brownie batter into the prepared baking pan and spread evenly. Bake for 20-25 minutes or until a toothpick inserted into the center comes out with a few moist crumbs. Remove from oven and cool in the pan while preparing the mousse layer.
- Melt Chocolate for Mousse: Using a double boiler method, melt 8 ounces of chopped bittersweet chocolate in a heatproof bowl over a pot of simmering water. Stir gently until smooth, then remove from heat and let cool slightly.
- Whip Cream: In a separate chilled bowl, whip 1 cup of heavy cream until soft peaks form. This will create the light and airy texture needed for the mousse.
- Fold Chocolate into Cream: Gently fold the slightly cooled melted chocolate into the whipped cream until fully incorporated, being careful to maintain the fluffy texture.
- Assemble and Chill: Once the brownie base has cooled completely, pour the chocolate mousse topping evenly over the brownies. Spread smoothly and refrigerate for at least 2 hours or until the mousse layer is set.
- Serve: After chilling, slice the brownies into 16 squares. Optionally garnish with shaved chocolate, fresh whipped cream, or fresh berries to enhance presentation and flavor before serving.
Notes
- Ensure the melted chocolate mixture is cooled before adding to eggs to avoid curdling.
- Do not overmix batter after adding flour to maintain moist and tender brownies.
- Use high-quality bittersweet chocolate for best flavor in both brownie and mousse layers.
- Chill brownies thoroughly to set the mousse topping firmly before slicing.
- For a gluten-free version, substitute all-purpose flour with a gluten-free flour blend.


