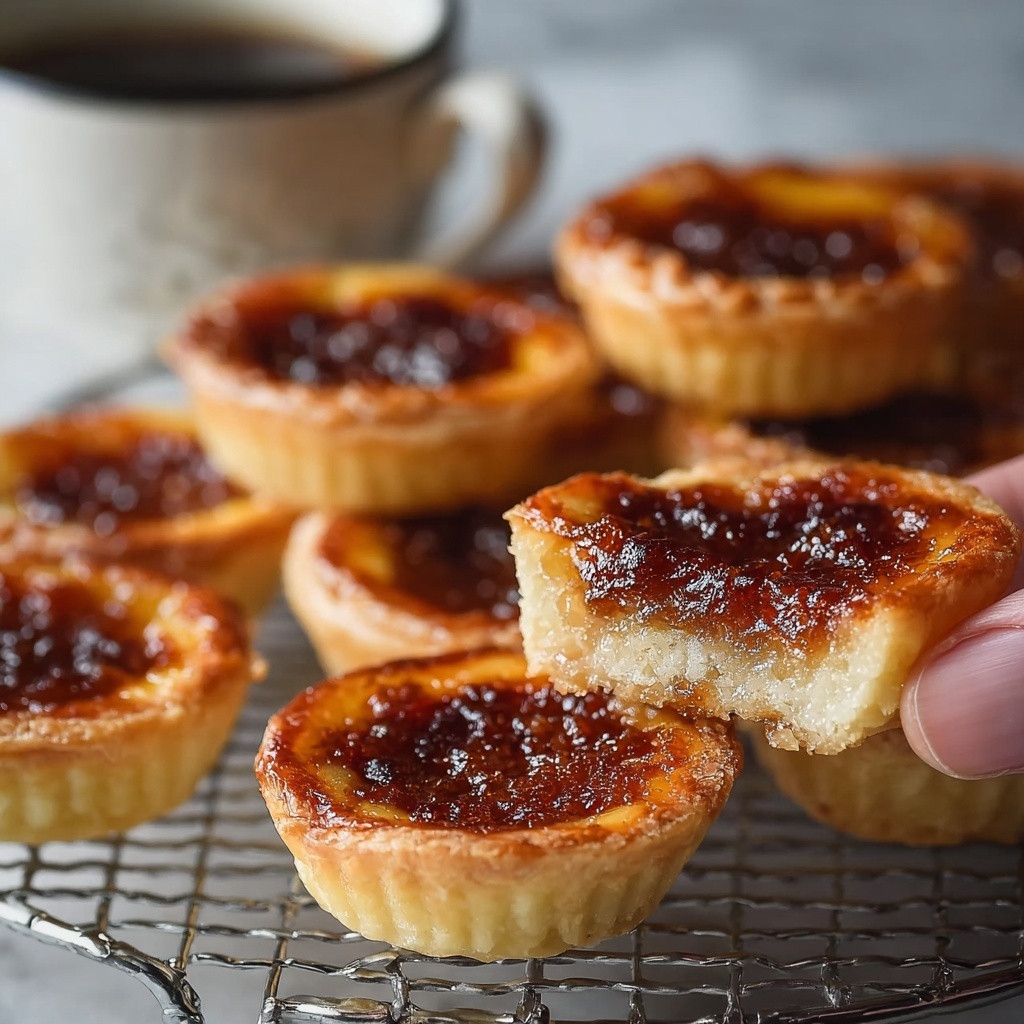
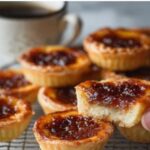
If you have a sweet tooth and a love for iconic Canadian desserts, you are absolutely going to adore this Butter Tarts: A Classic Canadian Treat Recipe. These little pastries are rich, buttery, and packed with a gooey filling that perfectly balances sweet and slightly caramelized flavors. Each bite offers a flaky crust hugging a luscious, syrupy center that has made butter tarts a beloved staple in Canadian kitchens for generations. Whether you’re baking for a cozy afternoon snack or a festive gathering, this recipe is a joyful celebration of simple ingredients coming together to create pure deliciousness.
Ingredients You’ll Need
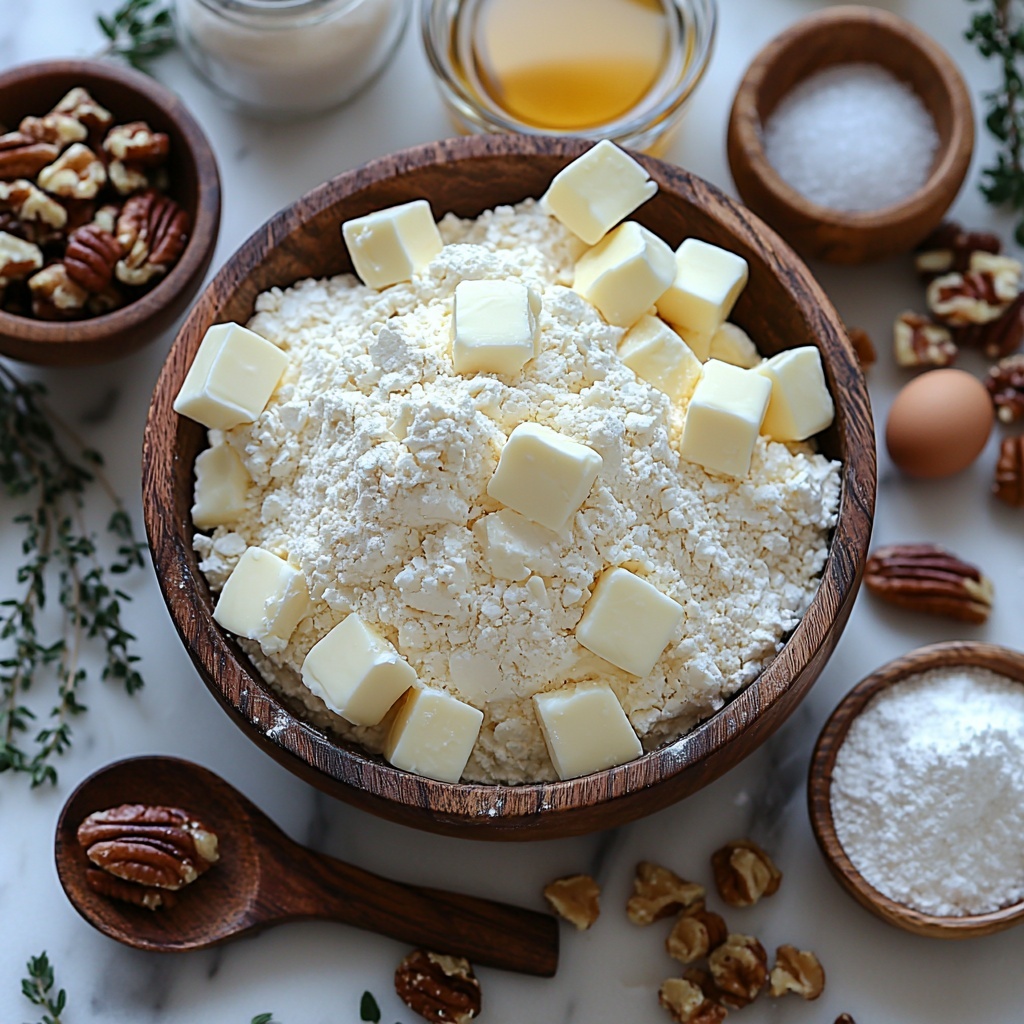
The magic behind making perfect butter tarts lies in using simple, quality ingredients that each play a crucial role. From the flaky crust to the caramel-like filling, every component adds texture, flavor, and that irresistible golden color.
- 1 1/4 cups all-purpose flour: The base for the crust, providing structure and a tender bite.
- 1/4 teaspoon salt: Just enough to enhance the flavors without overpowering sweetness.
- 1/2 cup unsalted butter (cold and cubed): Essential for that flaky, melt-in-your-mouth pastry texture.
- 1/4 cup granulated sugar: Adds subtle sweetness to the crust contrasting the filling.
- 1/4 cup cold water: Helps bind the dough just right without making it tough.
- 1/2 cup unsalted butter (melted): Gives the filling richness and depth.
- 1 cup brown sugar: Brings caramel notes and sweetness to the luscious filling.
- 1/2 cup corn syrup: Creates that signature gooey, slightly sticky texture we all love.
- 2 large eggs: Bind everything together and provide structure.
- 1 teaspoon vanilla extract: Adds warmth and complexity to the filling.
- 1/4 teaspoon salt: Balances the sweetness perfectly.
- Optional 1/2 cup raisins or chopped pecans/walnuts: For an added burst of texture and flavor if you like that extra something special.
How to Make Butter Tarts: A Classic Canadian Treat Recipe
Step 1: Combine Dry Ingredients
Begin by whisking together the flour and salt in a mixing bowl. This ensures your crust will have an even flavor base and sets you up for a tender, well-textured pastry.
Step 2: Cut in Butter
Add the cold, cubed butter to the flour mixture. Using a pastry cutter or your fingertips, work the butter into the flour until the mixture looks like coarse crumbs. This is key to achieving that flaky crust that’s so satisfying in every bite.
Step 3: Add Sugar
Stir in the granulated sugar. It sweetens the crust just enough to perfectly complement the filling without overshadowing it.
Step 4: Add Water
Gradually pour in the cold water, mixing gently until the dough starts to come together. Be careful not to overwork it; you want the dough to be cohesive but still tender.
Step 5: Chill the Dough
Shape the dough into a disk, wrap in plastic wrap, and pop it in the refrigerator for about 30 minutes. Chilling relaxes the gluten and firms the butter, making the dough easier to roll out and ensuring a crisp, flaky crust.
Step 6: Mix Ingredients for Filling
In a separate bowl, whisk the melted butter, brown sugar, corn syrup, eggs, vanilla extract, and salt until the mixture is smooth and glossy. If you’re feeling adventurous, fold in raisins or nuts here to add texture and bursts of flavor.
Step 7: Preheat the Oven
Get your oven warmed up to 375°F (190°C). A hot, consistent temperature is crucial for baking the butter tarts evenly and developing that gorgeous golden top.
Step 8: Roll the Dough
On a lightly floured surface, roll out the chilled dough to about 1/8 inch thickness. This thickness strikes the perfect balance — sturdy enough to hold the filling but delicate and flaky once baked.
Step 9: Cut and Place in Tins
Cut the dough into circles using a round cutter and gently press each one into greased muffin tins or tart pans. The dough should fit snugly to cradle the filling.
Step 10: Fill with Mixture
Pour the luscious filling into each pastry shell, filling about three-quarters full. This allows room for the filling to bubble and rise slightly without overflowing.
Step 11: Bake
Slide the tins into your preheated oven and bake for 20 to 25 minutes until the filling is set and the tops turn a delicate golden brown. The aroma at this stage is simply irresistible!
Step 12: Cool
Let the butter tarts cool in the pans for about 10 minutes before transferring them to a wire rack to cool completely. Cooling helps the filling firm up just enough while keeping the crust crisp.
Step 13: Serve
Enjoy your butter tarts warm or at room temperature, letting the gooey center and flaky crust dance in your mouth. This is truly the best way to experience this classic Canadian treasure.
How to Serve Butter Tarts: A Classic Canadian Treat Recipe
Garnishes
A simple dusting of powdered sugar can add a charming touch and a hint of extra sweetness. For a richer experience, serve with a dollop of whipped cream or a scoop of vanilla ice cream to balance the intense sweetness of the filling.
Side Dishes
Butter tarts pair wonderfully with a hot cup of coffee or tea, making them a perfect companion for brunch or afternoon snack time. For a festive spread, serve alongside fresh fruit or a crisp green salad to cut through the richness.
Creative Ways to Present
Try serving mini butter tarts on a beautiful dessert tray for parties, or place one atop a scoop of vanilla ice cream as a decadent dessert. You can also drizzle warm caramel or chocolate sauce for an even more indulgent presentation that will wow friends and family.
Make Ahead and Storage
Storing Leftovers
Butter tarts can be stored at room temperature in an airtight container for up to two days. To keep them fresh longer, refrigerate them for up to a week, but bring them to room temperature before serving to enjoy their full flavor and texture.
Freezing
If you want to make these ahead of time, butter tarts freeze beautifully. Simply wrap them individually in plastic wrap and place them in a freezer-safe bag or container. They will keep well for up to three months.
Reheating
To reheat frozen or refrigerated butter tarts, warm them in a 350°F (175°C) oven for about 10 minutes. This revives the flaky crust and softens the filling to its delightful, gooey glory once again.
FAQs
Can I make butter tarts without nuts or raisins?
Absolutely! Butter tarts are delicious on their own, and many traditional recipes leave out nuts or raisins to let the rich filling shine. Feel free to customize according to your preference.
What type of corn syrup is best to use?
Light corn syrup is ideal for this recipe because it provides sweetness and moisture without altering the flavor or color significantly, ensuring the filling stays glossy and gooey.
Can I use store-bought pie crust instead of making the pastry from scratch?
Yes, using a store-bought crust can save time and still yield delicious results. Just make sure to choose a high-quality butter crust for the best flavor and texture.
Why do some butter tarts have a runny center?
A slightly runny center is actually typical and part of what makes butter tarts so special. The filling should be gooey but not liquid; baking time may vary depending on your oven, so keep an eye on them.
Can I add other mix-ins besides raisins or nuts?
Definitely! Some people love adding chocolate chips, dried cranberries, or even coconut flakes to their butter tarts for a unique twist. Just add about half a cup and fold gently into the filling.
Final Thoughts
This Butter Tarts: A Classic Canadian Treat Recipe is the kind of dessert that warms hearts and brings smiles around the table. Its buttery crust and irresistibly sweet filling are easy to make but feel like a special indulgence every time. I encourage you to try baking these yourself — the joyful aroma, the perfect balance of textures, and the rich, gooey flavor will quickly make these your new favorite classic. Happy baking!
Print
Butter Tarts: A Classic Canadian Treat Recipe
- Prep Time: 20 minutes
- Cook Time: 20-25 minutes
- Total Time: 45 minutes
- Yield: 12 butter tarts
- Category: Dessert
- Method: Baking
- Cuisine: Canadian
Description
Butter Tarts are a beloved classic Canadian dessert featuring a flaky pastry crust filled with a gooey, sweet mixture of butter, brown sugar, corn syrup, and eggs. Optional raisins or nuts add texture and richness to these delightful tarts, which are perfect as a sweet snack or dessert.
Ingredients
For the Pastry:
- 1 1/4 cups all-purpose flour
- 1/4 teaspoon salt
- 1/2 cup unsalted butter (cold and cubed)
- 1/4 cup granulated sugar
- 1/4 cup cold water
For the Filling:
- 1/2 cup unsalted butter (melted)
- 1 cup brown sugar
- 1/2 cup corn syrup
- 2 large eggs
- 1 teaspoon vanilla extract
- 1/4 teaspoon salt
- Optional: 1/2 cup raisins or chopped pecans/walnuts
Instructions
- Combine Dry Ingredients: In a mixing bowl, whisk together the all-purpose flour and salt until evenly blended.
- Cut in Butter: Add the cold, cubed unsalted butter to the flour mixture. Using a pastry cutter or your fingertips, cut the butter into the flour until the mixture resembles coarse crumbs, ensuring a flaky pastry texture.
- Add Sugar: Stir in the granulated sugar to the flour and butter mixture to add sweetness.
- Add Water: Gradually incorporate the cold water into the mixture, mixing gently until the dough comes together without overworking it.
- Chill the Dough: Form the dough into a disk shape, wrap it in plastic wrap, and refrigerate for about 30 minutes to relax the gluten and firm up the butter.
- Mix Ingredients: In a separate bowl, whisk together melted butter, brown sugar, corn syrup, eggs, vanilla extract, and salt until smooth. Fold in raisins or chopped nuts if desired for added texture and flavor.
- Preheat: Preheat your oven to 375°F (190°C) to prepare for baking.
- Roll the Dough: On a lightly floured surface, roll out the chilled pastry dough to about 1/8 inch thickness for a delicate crust.
- Cut and Place in Tins: Using a round cutter, cut circles from the dough and gently press them into greased muffin tins or tart pans.
- Fill with Mixture: Pour the filling mixture into each pastry shell, filling them about three-quarters full to allow room for filling expansion during baking.
- Bake: Bake the butter tarts in the preheated oven for 20-25 minutes until the filling is set and the tops have a light golden brown color.
- Cool: Let the tarts cool in the pan for about 10 minutes before transferring them to a wire rack to cool completely for best texture.
- Serve: Enjoy the butter tarts either warm or at room temperature as a delightful Canadian treat.
Notes
- For added texture and traditional flavor, include raisins or chopped nuts like pecans or walnuts in the filling.
- Do not overwork the dough to keep the crust flaky and tender.
- Use cold butter and water to ensure a crisp pastry crust.
- Allow the tarts to cool completely for the filling to set properly before serving.

