“`html
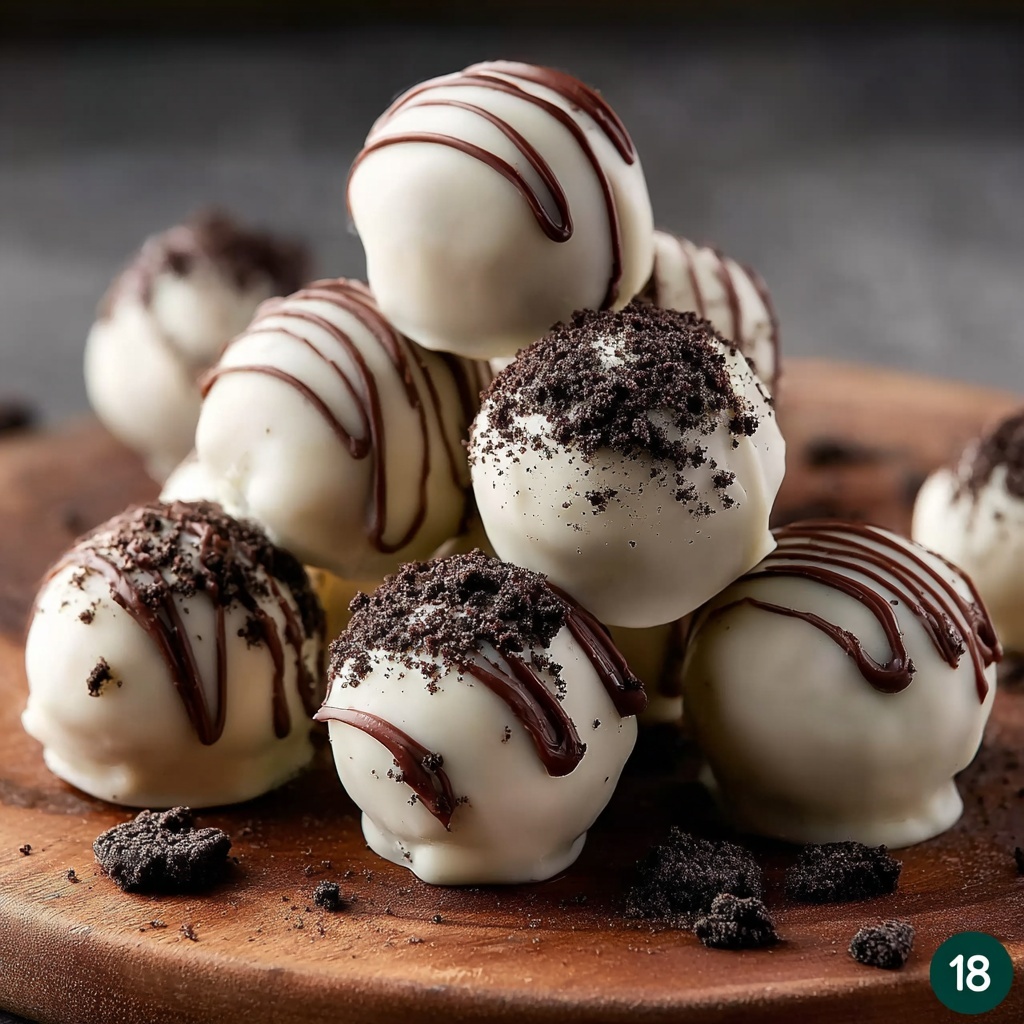
If you have ever dreamed of a bite-sized treat that delivers a perfect blend of creamy, chocolaty, and crunchy textures, then you are in for a real delight with this Oreo Balls (Oreo Truffles) Recipe. These irresistible little gems combine crushed Oreo cookies and smooth cream cheese, all wrapped in a luscious chocolate coating. Whether you’re looking for a decadent dessert for a party or a simple, no-fuss snack to brighten your day, this recipe brings joy and indulgence in every bite.
Ingredients You’ll Need
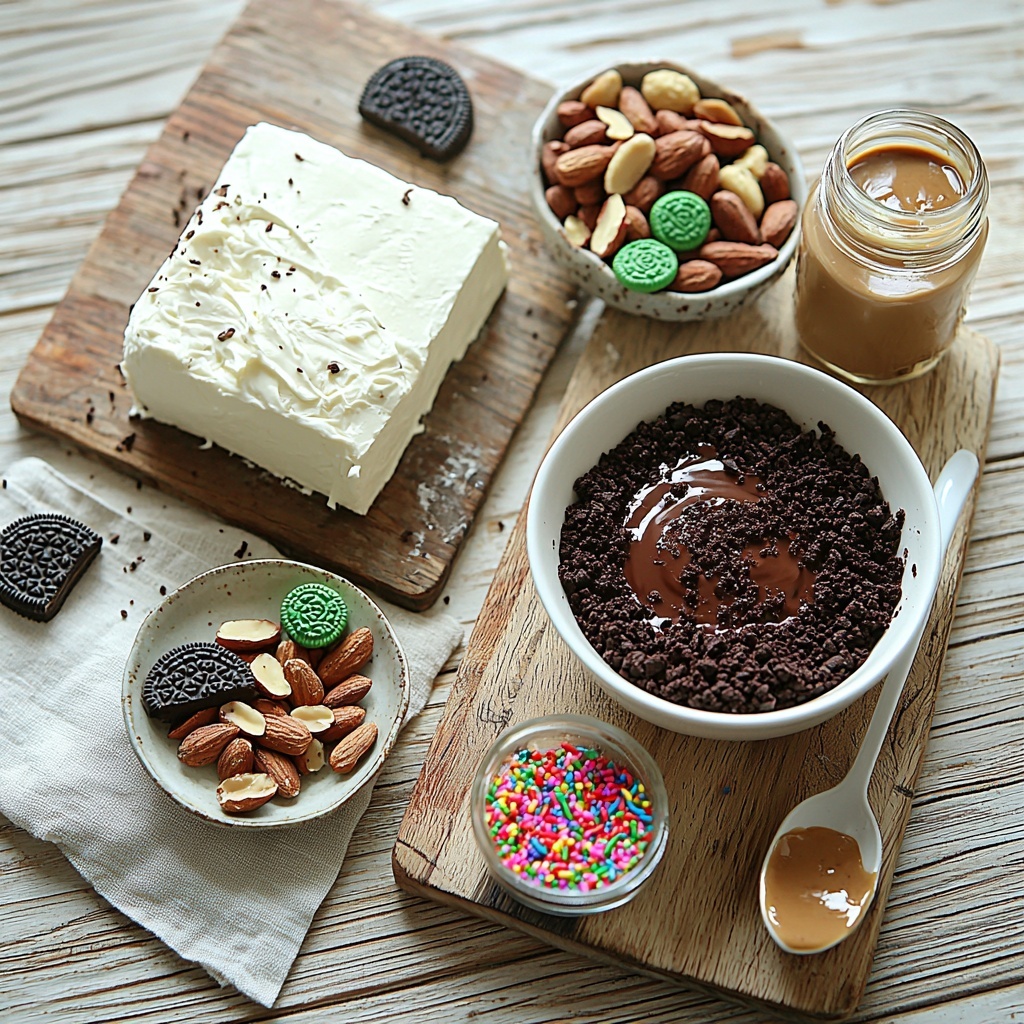
These ingredients are surprisingly simple, yet each one plays a starring role in creating that iconic texture and flavor that make Oreo Balls so addictive. From the crunchy cookie crumbs to the rich cream cheese and silky chocolate shell, every component is essential.
- 24 Oreo cookies (crushed): The heart of the recipe, providing that classic chocolatey crunch and sweetness.
- 8 oz (225g) cream cheese, softened: Adds luscious creaminess and binds the cookie crumbs together perfectly.
- 12 oz (340g) chocolate for coating (semi-sweet, milk, or white): Choose your favorite chocolate to create a smooth, shiny coating that hardens beautifully.
- 1 teaspoon vanilla extract: Enhances the overall flavor with a warm, aromatic note.
- Sprinkles (for decoration): Adds festive color and extra fun to the finished balls.
- Chopped nuts (such as almonds or pecans, for rolling or topping): Provides a delightful crunch and contrast if you love textural variety.
- 1 tablespoon peanut butter (for peanut butter twist variation): Mix in for a rich peanut butter flavor that fans adore.
- Crushed peppermint candies or mint-flavored Oreos (for minty variation): Perfect for refreshing holiday-inspired versions.
How to Make Oreo Balls (Oreo Truffles) Recipe
Step 1: Crush the Oreos
Begin by crushing the 24 Oreo cookies into fine crumbs. You can place them in a food processor for speedy results or inside a large zip-top bag and crush with a rolling pin. The finer the crumbs, the better your Oreo Balls will hold together and taste smooth.
Step 2: Mix in the Cream Cheese
In a mixing bowl, combine the crushed Oreo crumbs with the softened cream cheese and vanilla extract. Stir everything until you achieve a dense, even mixture that sticks together when pressed. This step is crucial for creating that creamy fudge-like center.
Step 3: Shape the Balls
Using your hands or a small cookie scoop, form the Oreo mixture into roughly 1-inch diameter balls. Place each one on a parchment-lined baking sheet, making cleanup effortless and keeping the balls from sticking.
Step 4: Chill the Dough Balls
Pop the baking sheet into the refrigerator for at least 30 minutes. This resting time firms up the balls, making them easier to coat without falling apart—a little patience for a perfect outcome!
Step 5: Coat the Balls in Chocolate
Melt your choice of chocolate carefully, either in short bursts in the microwave or over a double boiler. Use a fork or toothpick to dip each chilled ball into the warm chocolate, ensuring it’s completely covered. Gently shake off any excess chocolate before returning the coated balls to the parchment.
Step 6: Decorate and Chill
Before the chocolate hardens, add sprinkles, chopped nuts, or a drizzle of contrasting chocolate for an added flair. Then, chill again until the chocolate coating is firm and shiny. These finishing touches turn every bite into a delightfully joyful experience.
How to Serve Oreo Balls (Oreo Truffles) Recipe
Garnishes
Oreo Balls look great and taste even better when garnished. Sprinkle colorful nonpareils, crushed nuts, or drizzle with white or dark chocolate to make them look as exciting as they taste. This lets you customize each batch for holidays, birthdays, or simple indulgent moments.
Side Dishes
Serve Oreo Balls alongside a glass of cold milk or a steaming cup of coffee or hot cocoa. Their rich texture pairs wonderfully with something refreshing or warmly comforting to balance the sweetness and richness.
Creative Ways to Present
For parties, arrange Oreo Balls on decorative platters or in mini cupcake liners for easy grabbing. Alternatively, make themed assortments using the peanut butter or mint variations for guests to sample multiple flavors. Presentation truly elevates this beloved treat from simple to spectacular.
Make Ahead and Storage
Storing Leftovers
After enjoying your batch of Oreo Balls, store any leftovers in an airtight container in the refrigerator. They keep beautifully for 3-4 days, maintaining their texture and flavor, perfect for enjoying throughout the week.
Freezing
Want to make these treats in advance? Freeze the Oreo Balls in a single layer on a baking sheet, then transfer them to a freezer-safe container or bag. They freeze wonderfully for up to 1 month. When ready to enjoy, thaw them overnight in the refrigerator for best results.
Reheating
Since Oreo Balls are best enjoyed chilled, reheating isn’t necessary. If you prefer a softer texture, simply leave them at room temperature for 10-15 minutes before serving. This subtle thaw allows the cream cheese center to soften slightly without melting the chocolate shell.
FAQs
Can I use different types of Oreos for this recipe?
Absolutely! Classic Oreos are traditional, but feel free to experiment with mint, golden, or even peanut butter flavored Oreos to create unique variations of your Oreo Balls (Oreo Truffles) Recipe.
How do I prevent the chocolate from cracking once it’s set?
Ensure you dip the Oreo Balls in chocolate that has been properly melted and cooled slightly before coating. Also, chilling the balls before dipping and allowing the chocolate to harden slowly in the fridge helps keep the coating smooth and intact.
Can I make these dairy-free or vegan?
Yes, by using dairy-free cream cheese and vegan chocolate alternatives, you can enjoy a vegan version of Oreo Balls. Just double-check that the Oreos you use are vegan-friendly, as some varieties contain milk ingredients.
What is the best way to crush Oreos if I don’t have a food processor?
If you don’t have a food processor, place the Oreos in a sturdy zip-top bag and crush them using a rolling pin or the bottom of a heavy pan. Work gently to avoid crushing too unevenly; aim for fine crumbs for best results.
Can I add flavors or mix-ins to the Oreo Ball mixture?
Definitely! Incorporate peanut butter, crushed peppermint candies, or chopped nuts right into the mixture before shaping for exciting flavor twists. The Oreo Balls (Oreo Truffles) Recipe is wonderfully versatile and invites your creativity.
Final Thoughts
Oreo Balls (Oreo Truffles) Recipe truly is a crowd-pleaser that brings smiles with minimal effort. Whether you’re making them for a special occasion or just to treat yourself, these little bites of joy never disappoint. So grab your Oreos, cream cheese, and chocolate, and make some magic happen in your kitchen today—you’ll be amazed at how quickly they disappear!
“`
Print
Oreo Balls (Oreo Truffles) Recipe
- Prep Time: 15 minutes
- Cook Time: 0 minutes
- Total Time: 1 hour
- Yield: 24 servings
- Category: Dessert
- Method: No-Cook
- Cuisine: American
Description
These delicious Oreo Balls, also known as Oreo Truffles, are a rich and creamy no-bake dessert made from crushed Oreo cookies and cream cheese, coated in melted chocolate and decorated with sprinkles or nuts. Perfect for parties, holidays, or a sweet treat anytime, these bite-sized delights combine the iconic flavor of Oreos with smooth cream cheese and a luscious chocolate shell.
Ingredients
Main Ingredients
- 24 Oreo cookies (crushed)
- 8 oz (225g) cream cheese, softened
- 1 teaspoon vanilla extract
Chocolate Coating
- 12 oz (340g) chocolate for coating (semi-sweet, milk, or white)
Decorations and Variations
- Sprinkles (for decoration)
- Chopped nuts (such as almonds or pecans, for rolling or topping)
- 1 tablespoon peanut butter (for peanut butter twist variation)
- Crushed peppermint candies or mint-flavored Oreos (for minty variation)
Instructions
- Crush the Oreos: Place the Oreo cookies in a food processor or seal them in a large zip-top bag and crush until fine crumbs form. This forms the chocolatey base and texture for the Oreo Balls.
- Mix in the Cream Cheese: In a mixing bowl, combine the crushed Oreos with softened cream cheese and vanilla extract. Stir thoroughly until you achieve a dense, even mixture that holds together when pressed.
- Shape the Balls: Using your hands or a small cookie scoop, form the mixture into 1-inch balls. Arrange the balls on a parchment-lined baking sheet for easy cleanup.
- Chill the Dough Balls: Refrigerate the baking sheet with Oreo balls for at least 30 minutes to firm them up, making them easier to coat later.
- Coat the Balls in Chocolate: Melt your chosen chocolate in a microwave or double boiler. Using a fork or toothpick, dip each chilled Oreo ball into the melted chocolate, coating it completely. Shake off any excess chocolate and place the coated balls back onto the parchment paper.
- Decorate and Chill: Before the chocolate sets, decorate with sprinkles, chopped nuts, or drizzle additional chocolate if desired. Refrigerate the coated Oreo balls again until the chocolate coating is fully firm.
Notes
- You can customize the flavor by mixing in peanut butter, crushed peppermint candies, or mint-flavored Oreos into the base mixture.
- Soften the cream cheese to room temperature for smoother mixing and better texture.
- Ensure the Oreo balls are chilled before dipping to prevent them from falling apart during coating.
- Store the finished Oreo balls in an airtight container in the refrigerator for up to one week.
- Use different types of chocolate to vary the taste and appearance, such as milk, dark, or white chocolate.
