“`html
If you have a serious sweet tooth and a love for that perfect blend of creamy, crunchy, and chocolatey, then this Butterfinger Candy Bar Poke Cake Recipe is going to become your new obsession. Imagine a moist, tender cake soaked with a luscious pudding and sweetened condensed milk mixture, topped with cool whipped cream and crunchy Butterfinger candy bar bits. Every bite melts in your mouth with layers of flavor and texture that keep you coming back for more. This dessert is truly a showstopper that friends and family will rave about, whether it’s for a cozy night in or a festive celebration.
Ingredients You’ll Need
The magic of this Butterfinger Candy Bar Poke Cake Recipe lies in its simple yet thoughtful ingredients. Each component plays a vital role, from the cake’s fluffy base to the creamy pudding filling and the irresistible crunchy topping. Let’s dive into what you’ll need to bring this cake to life.
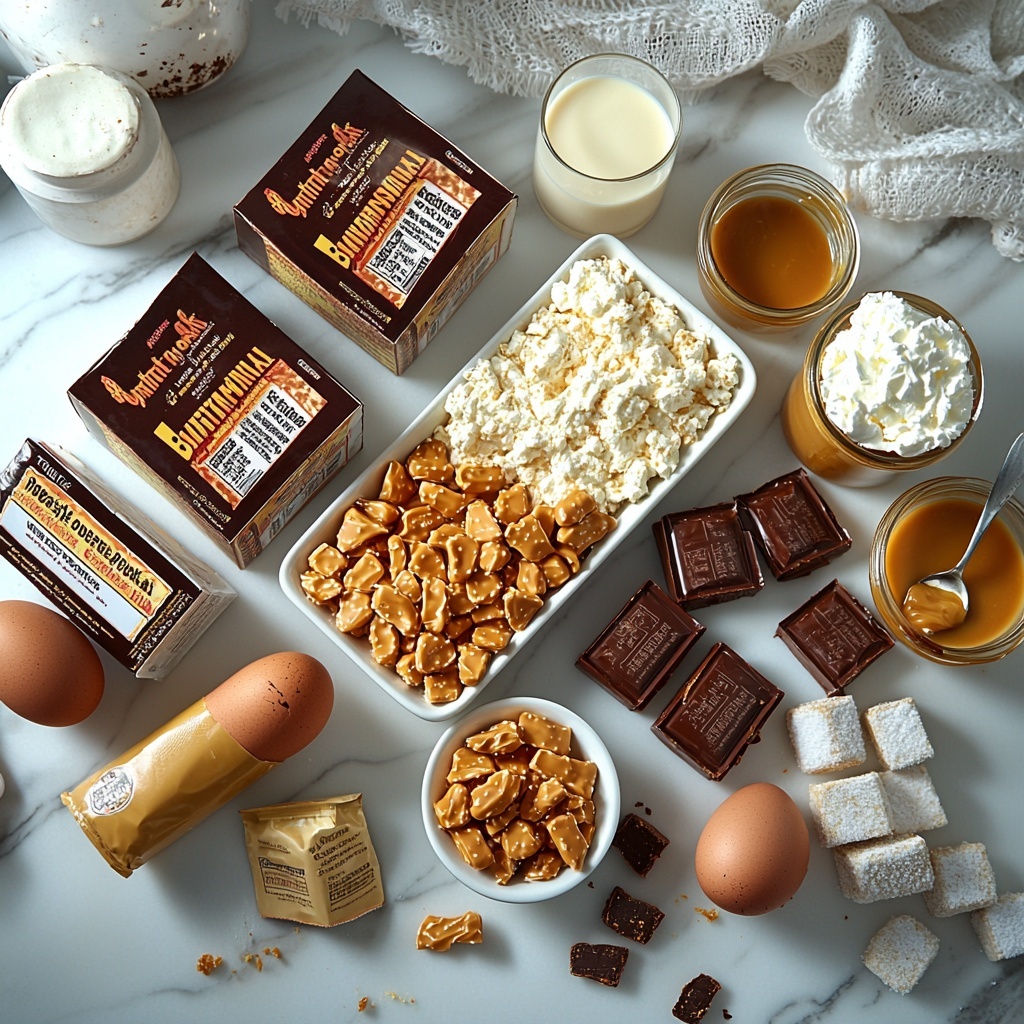
- 1 box chocolate or vanilla cake mix: The foundation for your cake, choose your favorite flavor for a base that’s moist and tender.
- 1 package instant pudding mix (vanilla or chocolate): Adds creamy richness and flavor that seeps into every bite.
- 2 cups cold milk: Essential for whisking with the pudding mix to create that smooth filling.
- 1 can (14 oz) sweetened condensed milk: Brings irresistible sweetness and moisture to the cake.
- 1 tub (8 oz) whipped topping (Cool Whip), thawed: Lightens the pudding mixture for a fluffy texture you’ll love.
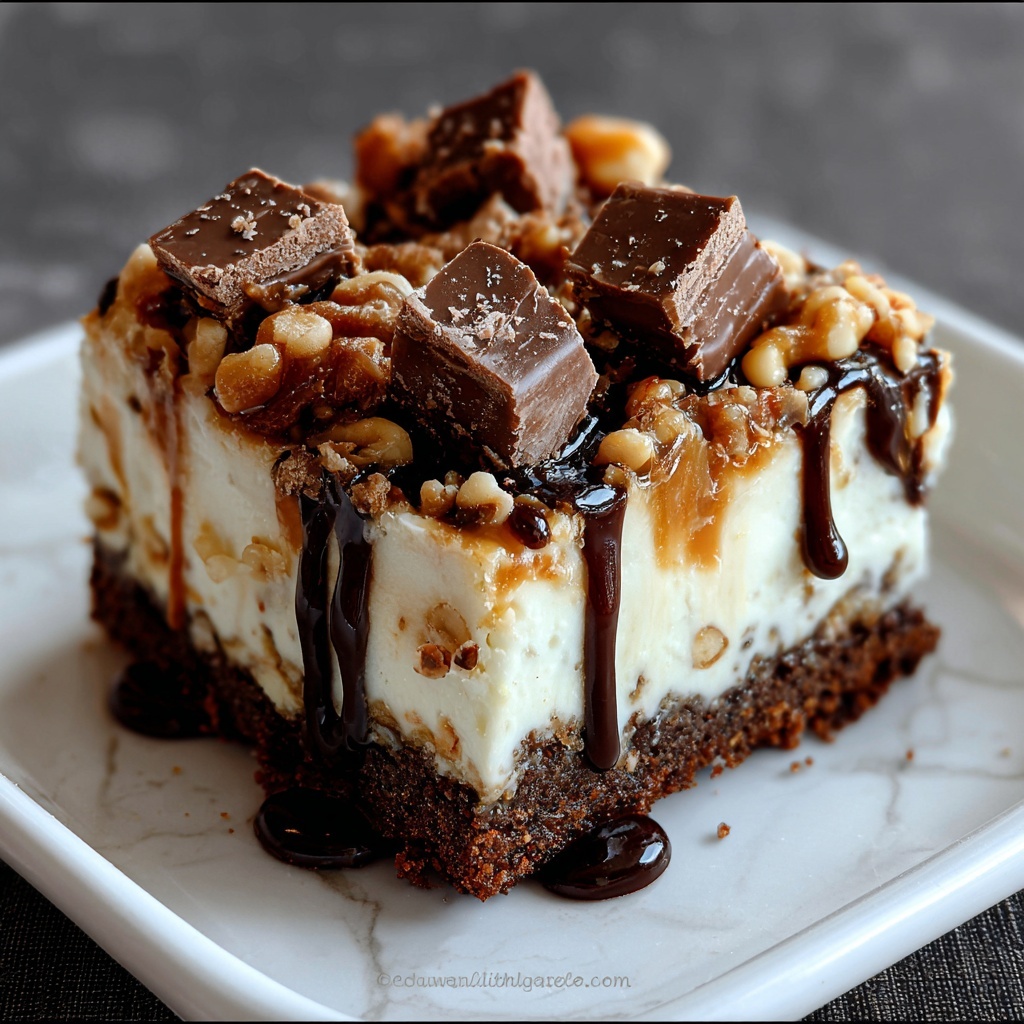
- 4–5 Butterfinger candy bars, chopped: The star ingredient for that signature crunchy, peanut buttery finish.
- Butter and sugar: Optional for greasing the pan or adding extra richness.
- Peanut butter (for drizzle): Adds a nutty complement that pairs beautifully with the Butterfinger bits.
- Caramel sauce (for drizzling): A sweet finishing touch that enhances the dessert’s decadence.
How to Make Butterfinger Candy Bar Poke Cake Recipe
Step 1: Bake the Cake
Start by preparing your boxed cake mix exactly according to the package instructions—whether you go with chocolate or vanilla, the choice is yours. Pour the batter into a greased 9×13-inch baking pan and bake it as directed. Once baked, let the cake cool just enough so it’s warm but not hot to the touch. This is perfect for the next step.
Step 2: Poke Holes in the Cake
Grab the handle of a wooden spoon or a skewer, and poke holes evenly all over the cake’s surface. This step is crucial because these little holes will allow the creamy pudding filling to sink in deeply, making each bite irresistibly moist and flavorful.
Step 3: Prepare the Filling
In a mixing bowl, whisk together the instant pudding mix and 2 cups of cold milk until it thickens beautifully. Next, stir in the sweetened condensed milk, giving the mixture an extra boost of sweet creaminess. Finally, gently fold in the thawed whipped topping, keeping everything light and fluffy for an amazing texture contrast in your cake.
Step 4: Pour Filling Over Cake
Carefully spoon or pour this luscious pudding mixture evenly over the cake, making sure to cover the entire surface and let the filling pour into all those poke holes. This guarantees every strand of cake is infused with flavor and moisture.
Step 5: Chill and Apply Toppings
Cover the cake tightly with plastic wrap and refrigerate for at least 2 hours. This chilling time lets the filling set perfectly and the flavors meld together. Right before serving, sprinkle the chopped Butterfinger candy bars generously on top for that signature crunch and peanut buttery goodness. To take it up a notch, drizzle some peanut butter and caramel sauce for an irresistible finishing touch.
How to Serve Butterfinger Candy Bar Poke Cake Recipe
Garnishes
Enhance your Butterfinger Candy Bar Poke Cake Recipe by adding extra garnishes like a sprinkle of crushed peanuts or a dusting of cocoa powder for a little extra flair. Fresh whipped cream dollops beside each slice also make serving feel extra special.
Side Dishes
A scoop of vanilla ice cream is a wonderful companion to this cake, adding an icy creaminess that balances the dessert’s richness. Fresh berries on the side can also lighten the experience with their natural tartness and color.
Creative Ways to Present
Serve this cake in clear glass dishes to show off all the fabulous layers or poke holes in individual cupcakes for personal-sized Butterfinger poke treats. Another fun idea is to place smaller slices on dessert plates and drizzle additional caramel and peanut butter artistically for a restaurant-worthy presentation.
Make Ahead and Storage
Storing Leftovers
Keep your Butterfinger Candy Bar Poke Cake Recipe covered tightly in the refrigerator, and it will stay fresh and delicious for 3-4 days. The flavors actually deepen over time, making leftovers just as enjoyable as the first serving.
Freezing
If you want to save some for later, you can freeze this cake after assembly by wrapping it securely with plastic wrap and aluminum foil. Frozen properly, it will keep well for up to 1 month. Just thaw overnight in the refrigerator before serving.
Reheating
This dessert is best enjoyed chilled, so reheating is not necessary. However, if you prefer a slightly softer texture, allow it to sit at room temperature for about 20 minutes before slicing and serving.
FAQs
Can I use homemade cake instead of a boxed mix?
Absolutely! While this recipe is wonderfully simple with a boxed mix, a homemade chocolate or vanilla cake will work just as well and add a personal touch.
What type of pudding mix works best for this recipe?
Both vanilla and chocolate instant pudding mixes pair beautifully with this cake. Vanilla offers a nice contrast with chocolate cake, while chocolate pudding intensifies the chocolate flavor.
Can I substitute the Butterfinger candy bars with something else?
You can experiment with other crunchy candy bars or chopped peanuts, but the Butterfinger bars have a unique crispy peanut butter flavor that really defines this recipe.
Is it necessary to use sweetened condensed milk?
Yes, sweetened condensed milk adds important sweetness and creamy moisture that help soak the cake and enhance the overall richness.
How long should I chill the cake before serving?
Refrigerate the cake for at least 2 hours, but longer chilling up to overnight only improves the flavor infusion and texture.
Final Thoughts
Now that you know the secrets behind this amazing Butterfinger Candy Bar Poke Cake Recipe, it’s time to gather your ingredients and start baking. It’s truly a dessert that rewards your efforts with deliciously moist cake, creamy pudding filling, and that unforgettable Butterfinger crunch. Trust me, once you make this, it will become your go-to crowd-pleaser and a staple at every dessert table. Enjoy every bite!
“`
Print
Butterfinger Candy Bar Poke Cake Recipe
- Prep Time: 45 minutes
- Cook Time: 30 minutes
- Total Time: 3 hours 15 minutes
- Yield: 12 servings
- Category: Dessert
- Method: Baking
- Cuisine: American
Description
This Butterfinger Candy Bar Poke Cake is a decadent dessert featuring a moist chocolate or vanilla cake base infused with creamy pudding and sweetened condensed milk. Topped with fluffy whipped topping and crunchy chopped Butterfinger candy bars, it offers a delightful combination of textures and flavors, with optional drizzles of peanut butter and caramel sauce for extra indulgence.
Ingredients
Cake
- 1 box chocolate or vanilla cake mix (plus ingredients required according to box instructions)
- Butter and sugar (optional, for extra richness in cake base or topping)
Filling
- 1 package instant pudding mix (vanilla or chocolate)
- 2 cups cold milk
- 1 can (14 oz) sweetened condensed milk
- 1 tub (8 oz) whipped topping (Cool Whip), thawed
Toppings
- 4–5 Butterfinger candy bars, chopped
- Peanut butter (for drizzle, optional)
- Caramel sauce (for drizzling, optional)
Instructions
- Bake the Cake: Prepare your boxed cake mix according to the package instructions. Pour the batter into a greased 9×13-inch baking pan and bake as directed. Once baked, allow the cake to cool slightly until it is warm but manageable to handle.
- Poke Holes in the Cake: Using the handle of a wooden spoon or a skewer, poke holes evenly spaced across the entire surface of the warm cake. These holes allow the filling to seep deeply, enhancing the cake’s moisture and flavor in every bite.
- Prepare the Filling: In a mixing bowl, whisk the instant pudding mix with 2 cups of cold milk until thickened. Stir in the sweetened condensed milk until fully blended. Gently fold in the thawed whipped topping, mixing carefully to keep the texture light and fluffy.
- Pour Filling Over Cake: Slowly pour or spoon the creamy pudding mixture evenly over the cake, making sure it seeps into all the poke holes and covers the entire surface to maximize flavor absorption.
- Chill and Apply Toppings: Cover the cake with plastic wrap and refrigerate for at least 2 hours to allow the pudding filling to set. Before serving, generously sprinkle the top with chopped Butterfinger candy bars. Optionally, drizzle with peanut butter and caramel sauce for an added layer of indulgence.
Notes
- Use a wooden spoon handle or skewer to poke holes without breaking apart the cake.
- For extra moisture and richness, brushing the cake with a little butter and sugar before adding the filling is optional.
- If desired, warm peanut butter slightly to thin it for easier drizzling.
- This cake is best served chilled but should be brought to room temperature for 15 minutes before serving for optimal texture.
- Store leftovers covered in the refrigerator for up to 3 days.

