
If you’ve ever dreamed of a cake that feels both elegant and irresistibly cozy, then diving into this White Forest Cake Recipe is your next sweet adventure. Imagine layers of soft, fluffy cake, delicately scented with vanilla, generously swathed in fluffy whipped cream, and bursting with luscious cherry pie filling—all crowned with delicate shavings of white chocolate. This cake not only dazzles the eyes but also delights every bite with a perfect harmony of flavors and textures, making it an unforgettable centerpiece for any occasion.
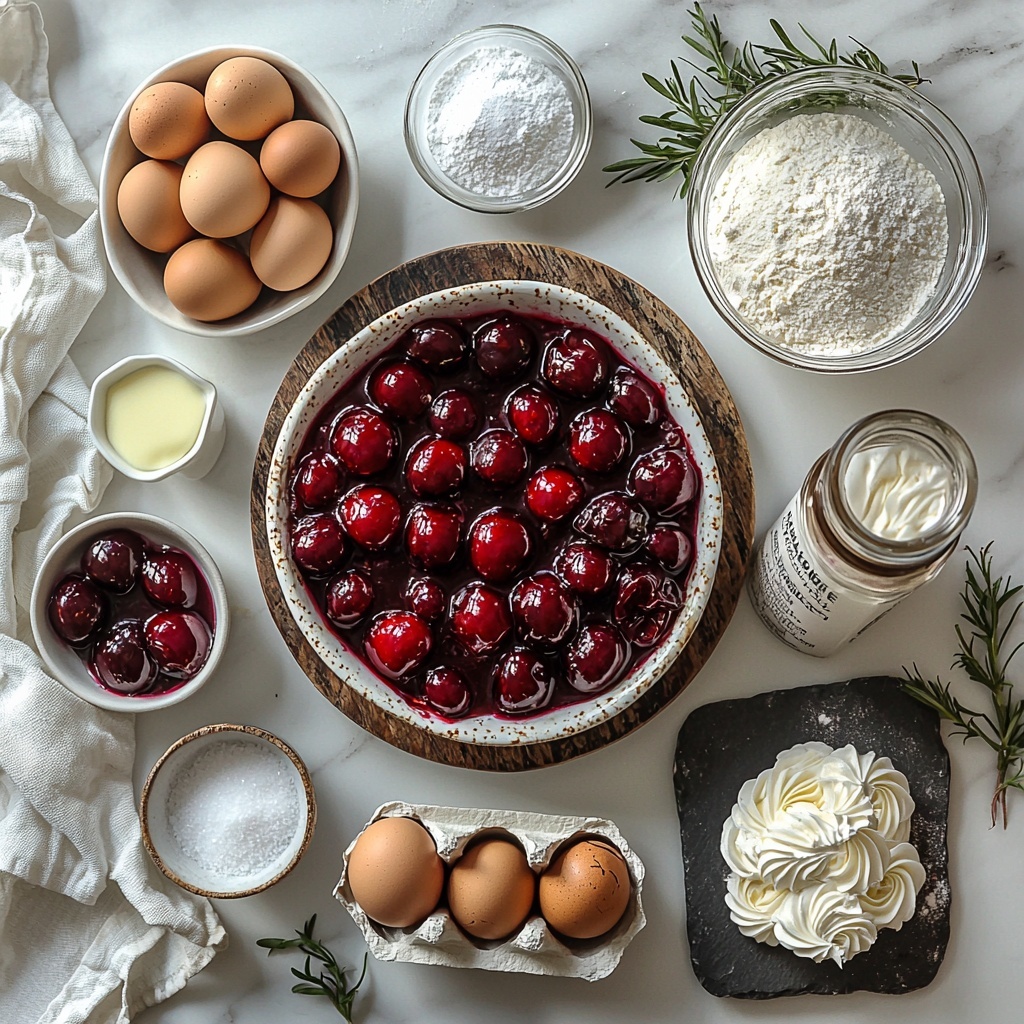
Ingredients You’ll Need
Gathering your ingredients for this White Forest Cake Recipe is a breeze, and each one plays a special role in creating that dreamy balance of taste and texture. From the simple flour and sugar foundation to the indulgent white chocolate toppings, these essentials combine to bring the cake to life.
- 2 1/2 cups all-purpose flour: The sturdy base for a tender, moist cake crumb.
- 2 1/2 tsp baking powder: The secret to the cake’s perfect rise and fluffiness.
- 1/2 tsp salt: Enhances all the sweet flavors without being overpowering.
- 1 cup unsalted butter, softened: Adds richness and a melt-in-your-mouth texture.
- 1 1/2 cups sugar: Sweetens the batter just right, balancing the tart cherries.
- 4 large eggs: Help bind ingredients and provide structure for the cake.
- 1 tsp vanilla extract: Brings warmth and depth to the cake’s flavor profile.
- 1 cup milk: Keeps the batter moist and tender.
- 1 can (21 oz) cherry pie filling: Bursts of fruity tartness that complement the creaminess perfectly.
- 2 cups heavy whipping cream: Whipped to luscious peaks for that classic, cloud-like frosting.
- 1/4 cup powdered sugar: Sweetens and stabilizes the whipped cream.
- 1 tsp vanilla extract (for whipped cream): Adds a delicate aroma to the frosting.
- 8 oz white chocolate, shaved or grated: The glamorous finishing touch both visually stunning and delicious.
How to Make White Forest Cake Recipe
Step 1: Prepare Your Pans and Oven
Start by preheating your oven to 350°F (175°C), ensuring it reaches the perfect baking temperature. Grease and flour two 9-inch round cake pans to prevent sticking and help your cakes come out perfectly shaped every time.
Step 2: Mix the Dry Ingredients
Whisk together the all-purpose flour, baking powder, and salt in a medium bowl. This step ensures the leavening agents and seasoning get evenly dispersed, setting the stage for a tender yet properly risen cake.
Step 3: Cream Butter and Sugar
In a large bowl, beat the softened butter and sugar until light and fluffy. This process incorporates air, which makes the cake wonderfully airy and tender. Then, add the eggs one at a time, beating well after each addition for a smooth and well-emulsified batter. Stir in the vanilla extract to infuse warm flavor throughout the cake.
Step 4: Combine Wet and Dry Ingredients
Gradually alternate adding the flour mixture and milk to the butter mixture, beginning and ending with the flour. Mixing until just combined helps avoid overworking the batter, which keeps the cake tender and soft.
Step 5: Bake the Cake Layers
Pour the batter evenly into the prepared pans and bake for 25-30 minutes. You’ll know they’re done when a toothpick inserted into the center comes out clean. Let the cakes cool completely, so the layers remain firm but moist for assembly.
Step 6: Whip the Cream
While the cakes are cooling, whip the heavy cream together with powdered sugar and vanilla extract until stiff peaks form. This luscious, airy cream will be the crowning glory and main frosting of your White Forest Cake Recipe.
Step 7: Assemble the Cake
Place one cake layer on a serving plate, spread a generous layer of whipped cream over it, and spoon half of the cherry pie filling on top. Layer the second cake over this and repeat the whipped cream and cherry topping. Finish by garnishing the entire cake with white chocolate shavings for that signature look and that perfect hint of sweetness.
How to Serve White Forest Cake Recipe
Garnishes
White chocolate shavings offer not just visual appeal but a delicate crunch that complements the softness of the cake and cream. You might also consider fresh cherries or a light dusting of powdered sugar for an extra flourish that highlights the cake’s classic flavors beautifully.
Side Dishes
This cake is a complete dessert in itself, but pairing it with a simple scoop of vanilla ice cream or a cup of rich, freshly brewed coffee or tea can elevate the eating experience and balance the sweetness of the cake.
Creative Ways to Present
For a charming touch, cut each slice with a warm knife to keep the layers neat. Serve on elegant white plates to make the white chocolate and cherry colors pop, or try layering individual portions in clear glasses for a whimsical parfait-style presentation that’s perfect for parties.
Make Ahead and Storage
Storing Leftovers
After enjoying a slice (or two), wrap the remaining White Forest Cake tightly with plastic wrap or store in an airtight container in the refrigerator. It will stay fresh and delicious for 3-4 days, giving you plenty of time to savor every last bit.
Freezing
If you want to save this treat for later, freeze the fully assembled cake by wrapping it well in plastic wrap and then foil. When stored properly, it can keep beautifully frozen for up to one month. Just remember to thaw it slowly in the refrigerator before serving.
Reheating
Because this cake is best enjoyed cool and creamy, reheating isn’t recommended. Instead, allow refrigerated or thawed slices to sit at room temperature for 20-30 minutes to bring out the flavors and soften the cake layers slightly.
FAQs
Can I substitute fresh cherries for the cherry pie filling?
Absolutely! Fresh cherries add a wonderful natural tartness and texture, but you might need to sweeten and thicken them slightly to mimic the filling’s consistency for easy layering.
Is it possible to make this cake vegan or dairy-free?
Yes, by replacing butter with plant-based margarine, milk with almond or oat milk, and using a dairy-free whipping cream alternative, you can adapt this White Forest Cake Recipe to suit vegan or dairy-free diets.
How do I get the whipped cream to stiff peaks?
Chill your mixing bowl and beaters beforehand, use cold heavy cream, and whip at medium-high speed. Stiff peaks are when the cream holds firm spikes without drooping when you lift the whisk.
Can I make the cake layers a day ahead?
Definitely! Baking the layers the day before assembly is a great way to save time. Just wrap them tightly in plastic wrap and store at room temperature or in the fridge until ready to assemble.
What’s the best way to shave white chocolate?
Use a vegetable peeler or a sharp knife to create thin curls or shavings from a block of white chocolate. Work slowly to avoid breaking the chocolate, and keep it cool to maintain its texture.
Final Thoughts
Making this White Forest Cake Recipe is like creating a delicious celebration in your kitchen. Its balance of creamy, fruity, and sweet notes makes each bite something truly special. Whether you’re serving it for a gathering or treating yourself, this cake never fails to impress and comfort at the same time. I can’t wait for you to try it—happy baking and even happier tasting!
Print
White Forest Cake Recipe
- Prep Time: 20 minutes
- Cook Time: 30 minutes
- Total Time: 1 hour
- Yield: 12 servings
- Category: Dessert
- Method: Baking
- Cuisine: American
Description
This White Forest Cake is a luscious twist on the classic Black Forest, featuring layers of moist vanilla cake filled with sweet cherry pie filling and rich whipped cream, all topped with delicate white chocolate shavings. Perfect for celebrations or any special occasion, this cake combines fluffy texture and fruity sweetness in every bite.
Ingredients
Cake:
- 2 1/2 cups all-purpose flour
- 2 1/2 tsp baking powder
- 1/2 tsp salt
- 1 cup unsalted butter, softened
- 1 1/2 cups sugar
- 4 large eggs
- 1 tsp vanilla extract
- 1 cup milk
Filling and Topping:
- 1 can (21 oz) cherry pie filling
- 2 cups heavy whipping cream
- 1/4 cup powdered sugar
- 1 tsp vanilla extract (for whipped cream)
- 8 oz white chocolate, shaved or grated
Instructions
- Preheat and Prepare Pans: Preheat your oven to 350°F (175°C). Grease and flour two 9-inch round cake pans to prevent sticking and ensure easy cake removal.
- Mix Dry Ingredients: In a medium bowl, whisk together the all-purpose flour, baking powder, and salt to evenly distribute the leavening agents and seasoning.
- Cream Butter and Sugar: In a large bowl, use a mixer to cream the softened unsalted butter and sugar until the mixture is light and fluffy. This step incorporates air for a tender crumb. Then, add the eggs one at a time, beating well after each addition to fully incorporate. Stir in the vanilla extract for flavor.
- Combine Wet and Dry Mixtures: Gradually add the flour mixture to the creamed butter mixture, alternating with the milk. Start and end with the flour mixture and mix just until combined to avoid overmixing which can make the cake dense.
- Bake the Cake Layers: Divide the batter evenly between the prepared pans. Bake in the preheated oven for 25-30 minutes or until a toothpick inserted into the center of the cakes comes out clean. Remove from oven and allow cakes to cool completely on a wire rack.
- Prepare Whipped Cream: In a chilled bowl, whip the heavy cream with powdered sugar and vanilla extract until stiff peaks form. This will be used for both layering and frosting the cake.
- Assemble the Cake: Place one cooled cake layer on your serving plate. Spread an even layer of whipped cream over the top, then spoon half of the cherry pie filling evenly over the whipped cream.
- Add Second Layer and Finish: Carefully place the second cake layer on top. Cover the entire cake with the remaining whipped cream. Spoon the remaining cherry pie filling on top, distributing it attractively. Finally, garnish the cake with white chocolate shavings for an elegant finish.
Notes
- Make sure the cakes are completely cooled before assembling to prevent the whipped cream from melting.
- For best results, chill the bowl and beaters before whipping the cream to help it whip faster and hold better.
- You can substitute cherry pie filling with fresh pitted cherries simmered with sugar if preferred.
- Store the assembled cake in the refrigerator and consume within 2-3 days for optimal freshness.
- To make cutting easier, chill the cake for 30 minutes before slicing.

