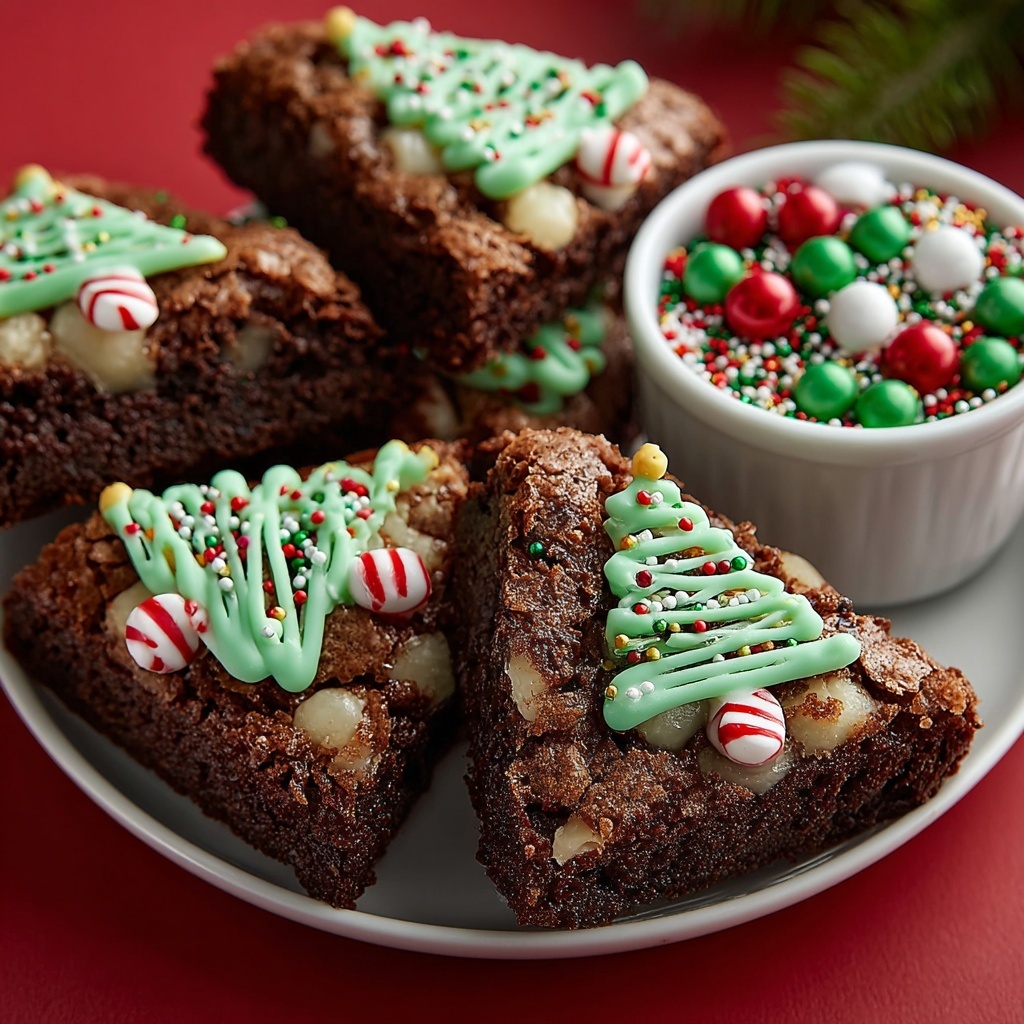
There is something truly magical about festive treats that bring both joy and deliciousness to the holidays, and this Brownie Christmas Trees Recipe is exactly that kind of delight. Imagine biting into a rich, fudgy brownie shaped like a Christmas tree, topped with vibrant green frosting and sparkly sprinkles that instantly transport you to a winter wonderland. Whether you are baking for a holiday party or just want to add a fun seasonal twist to your dessert table, this recipe offers an easy, crowd-pleasing way to impress without hours in the kitchen.

Ingredients You’ll Need
The beauty of the Brownie Christmas Trees Recipe lies in its simplicity. Each ingredient plays a key role, offering that perfect balance of fudgy texture, creamy frosting, and festive color to make these treats shine.
- 1 (18oz.) box brownie mix: The foundation of these trees, providing quick convenience and reliable chocolaty richness.
- Extra ingredients called for on the box (usually oil, eggs, and water): These activate and bind the brownie mix to create that perfect fudgy base.
- 1 additional egg yolk: Adds extra moisture and richness to the brownie batter, ensuring a tender crumb.
- 1 (16oz.) tub vanilla frosting: Smooth and sweet, perfect for coloring and decorating those tree tops.
- Green food coloring: This turns the frosting into a vibrant green canopy, bringing the Christmas tree design to life.
- Sprinkles: A festive touch that adds sparkle and personality to each tree.
- Candy canes: Used as the trunk or stem, these add a crisp peppermint kick and adorable decoration detail.
How to Make Brownie Christmas Trees Recipe
Step 1: Preheat and Prepare
Start by preheating your oven to the temperature recommended on your brownie mix box; this step ensures even baking times and that perfect dense texture. While the oven warms, line a 9×9-inch baking pan with parchment paper, letting the edges hang over so the brownie slab can be removed easily once baked. This little preparation trick makes shaping and decorating much simpler later.
Step 2: Mix Your Batter
Grab a large bowl and whisk together the brownie ingredients you see on the box along with one extra egg yolk. The yolk is a secret weapon to add moisture and richness, so don’t skip it! Be careful not to overmix; stirring until the flour just disappears keeps your brownies soft and tender.
Step 3: Bake and Cool
Pour that luscious batter into your parchment-lined pan and bake according to the instructions on the box. Keep a close eye in the final minutes to avoid overbaking since fudgy brownies make the best Christmas trees. Once done, transfer the pan onto a wire rack and let the brownies cool completely before moving on — patience here makes the cutting and decorating a dream.
Step 4: Color Your Frosting
While the brownies are cooling, mix your vanilla frosting with green food coloring. Blend until you achieve a bright, Christmas tree green that will give your treats a festive flourish. This frosting is both your “glue” and your magic painter’s brush for transforming simple brownies into charming holiday trees.
Step 5: Remove and Trim Edges
Lift the now-cooled brownies from the pan using the parchment paper overhang. Trim the outer edges to create a neat rectangle — this tidy shape will make slicing the brownies into uniform triangles easier and more visually appealing.
Step 6: Cut Into Trees
Cutting your brownies into Christmas trees can be done two ways depending on your crowd size and presentation style. For 18 small trees, slice brownies into three long strips, then cut each strip into six triangles by first sectioning squares and cutting diagonally. Alternatively, for 8 larger trees, slice the brownies in half lengthwise, then cut each half into four triangles. Slightly trimming ends into angles will give a more realistic tree shape.
Step 7: Decorate Your Trees
Use a piping bag or knife to generously frost each tree with your green icing. Sprinkle on your chosen colorful or festive sprinkles, making each tree uniquely dazzling. Finally, stick a piece of candy cane into the bottom of each triangle to serve as the tree trunk — not only does it look adorable, but it adds a delightful peppermint crunch.
How to Serve Brownie Christmas Trees Recipe
Garnishes
Adding finishing touches makes these brownie trees irresistible. Consider using edible glitter for extra sparkle or mini edible silver pearls to mimic ornaments. Fresh cranberries or pomegranate seeds can create a pop of red that contrasts beautifully with green frosting. Each piece may become a little edible artwork, perfect for holiday gatherings.
Side Dishes
Brownie Christmas Trees make a wonderful centerpiece on a dessert table, especially alongside lighter items that balance their richness. Serve with fresh fruit salad, peppermint hot chocolate, or a scoop of vanilla bean ice cream to create a variety of flavors and textures that will keep everyone coming back for more. The density of the brownies pairs perfectly with something refreshing or creamy.
Creative Ways to Present
Presentation is half the fun! Arrange your brownie trees upright on a platter with some powdered sugar “snow” sprinkled around for a snowy forest effect. Use a box or basket lined with festive fabric to create a gift-like display at a party. You can even use them as edible place cards by attaching small tags with guests’ names, turning dessert into a conversation starter.
Make Ahead and Storage
Storing Leftovers
If you have leftovers of the Brownie Christmas Trees Recipe, store them in an airtight container at room temperature. They will keep well for up to 3 days without losing the moist texture. Avoid refrigerating as it can dry out the brownies, and the frosting may become less appealing.
Freezing
These brownies freeze beautifully. Wrap each brownie tree individually in plastic wrap, then place in a freezer-safe container or bag. They can be frozen for up to 3 months. When ready to enjoy, thaw them overnight in the refrigerator to help preserve that fresh-baked texture and flavor.
Reheating
To bring back a fresh-from-the-oven feel, let your thawed brownie trees come to room temperature and warm them gently in the microwave for about 10 seconds. Be cautious not to melt the frosting; a little warming enhances the fudgy texture without compromising the decorations.
FAQs
Can I use homemade brownies for the Brownie Christmas Trees Recipe?
Absolutely! While the recipe is designed around a brownie mix for convenience, homemade brownies can make these Christmas trees even more special. Just ensure they are firm enough to hold shape when cut into triangles.
What kind of frosting works best for decorating the Christmas trees?
Vanilla buttercream or store-bought vanilla frosting works wonderfully due to its smooth texture and neutral flavor. Adding green food coloring gives that classic tree look, and the consistency is perfect for piping and spreading.
Can I make these without candy canes?
Of course! If you want to skip the candy cane trunks, consider using pretzel sticks, chocolate sticks, or even a small biscuit piece as a creative alternative. These options still provide structural support and add a tasty twist.
How far in advance can I make Brownie Christmas Trees Recipe?
You can prepare and decorate the trees a day in advance and keep them covered at room temperature. This allows the flavors to meld nicely and saves you time on the actual day of your event.
What should I do if my brownies are cracked or uneven?
Trimming the edges and tops ensures a smooth cutting surface. If cracks appear, no worries—cover them with frosting when decorating or use sprinkles to mask imperfections. Remember, rustic charm often adds character!
Final Thoughts
If you’re looking to add a sprinkle of holiday magic to your dessert lineup, the Brownie Christmas Trees Recipe is a charming and delicious way to do just that. It’s simple enough for a last-minute treat yet impressive enough to steal the show. Baking these festive brownies is not only a joy in itself but also an opportunity to share smiles and sweet moments with friends and family. Give this recipe a try — your holiday celebrations will thank you!
Print
Brownie Christmas Trees Recipe
- Prep Time: 20 minutes
- Cook Time: 35 minutes
- Total Time: 55 minutes
- Yield: 18 servings
- Category: Dessert
- Method: Baking
- Cuisine: American
Description
Delight in the festive charm of Brownie Christmas Trees, a fun and easy holiday treat featuring rich brownies cut into adorable tree shapes, decorated with green tinted frosting, sprinkles, and candy cane trunks. Perfect for parties or gifting, these adorable desserts combine classic brownie flavors with whimsical holiday spirit for a crowd-pleasing seasonal dessert.
Ingredients
Brownie Base
- 1 (18 oz.) box brownie mix
- Ingredients called for on back of brownie mix box (usually oil, eggs, and water)
- 1 additional egg yolk
Decorations
- 1 (16 oz.) tub vanilla frosting
- Green food coloring
- Sprinkles
- Candy canes
Instructions
- Preheat Oven: Preheat your oven to the temperature indicated on the brownie mix box, ensuring even baking for the brownies.
- Prepare Baking Pan: Line a 9×9-inch baking pan with parchment paper, leaving extra paper hanging over the edges to easily lift the brownies out once baked.
- Mix Brownie Batter: In a large bowl, whisk together all ingredients specified on the brownie mix box along with 1 additional egg yolk. Be careful to mix just until the flour disappears to avoid over-mixing.
- Bake Brownies: Pour the batter into the prepared pan and bake according to box instructions, checking a few minutes before the minimum recommended time to prevent overbaking.
- Cool Brownies: Allow the brownies to cool completely in the pan placed on a wire rack.
- Prepare Green Frosting: While the brownies cool, mix the vanilla frosting with green food coloring until you achieve the desired shade for your Christmas trees.
- Remove and Trim Brownies: Carefully lift the cooled brownies out of the pan using the parchment edges and trim off the outer edges to create a clean shape.
- Ensure Complete Cooling: Do not cut the brownies until they are completely cooled. If needed, refrigerate to firm them up further.
- Cut Small Trees: For 18 small trees: slice the brownies into 3 long strips, then cut each strip into 6 triangles by first cutting squares and then diagonally each square in half.
- Cut Large Trees: For 8 large trees: cut the brownies in half lengthwise, trim the ends at an angle, then cut each half into 4 triangles creating a zig-zag pattern.
- Decorate: Use the green frosting to ice each brownie tree, add sprinkles for festive flair, and place a small piece of candy cane at the bottom of each triangle to mimic the tree trunk.
Notes
- Be careful not to over-mix the brownie batter to keep the brownies moist and fudgy.
- Checking the brownies a few minutes before the recommended bake time helps prevent dryness.
- Let the brownies cool completely before cutting to maintain clean edges and prevent crumbling.
- You can adjust the amount of green food coloring to get your preferred tree color intensity.
- Use mini candy canes or break regular candy canes into smaller pieces for the tree trunks.

