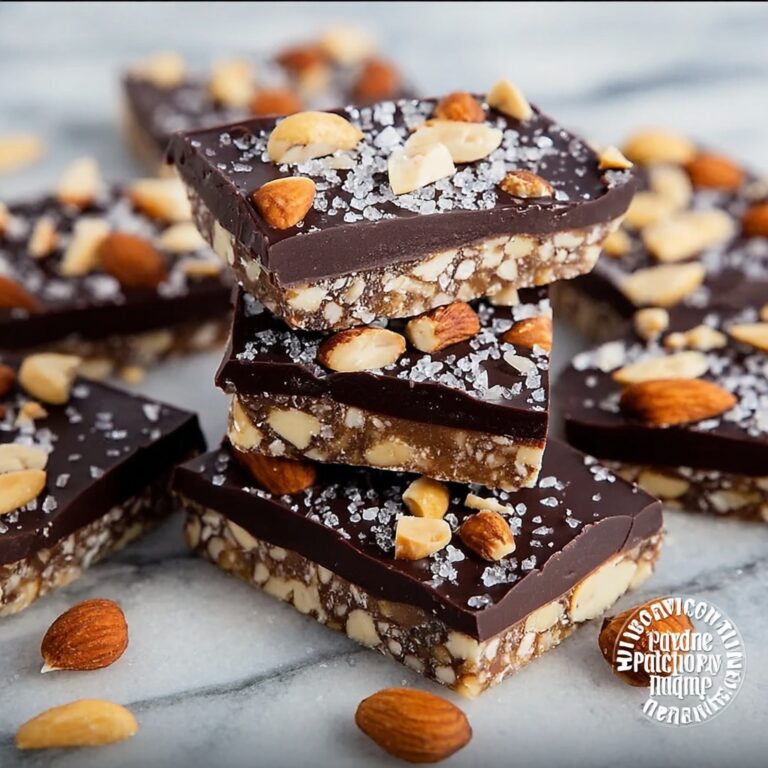
If you have a sweet tooth and crave something truly decadent, this Homemade Chocolate Truffles Recipe is your new best friend in the kitchen. These rich, velvety truffles melt in your mouth with every bite, combining the deep flavors of quality chocolate and cream to create a simple yet luxurious treat. Whether you’re making them as a gift or a special indulgence, this recipe promises to deliver silky smooth, perfectly rounded truffles that anyone will adore.
Ingredients You’ll Need
One of the best things about this truffle recipe is how few ingredients you need to create a dessert that feels like a masterpiece. Each component plays a crucial role in building the luscious texture and rich taste that make these truffles so unforgettable.
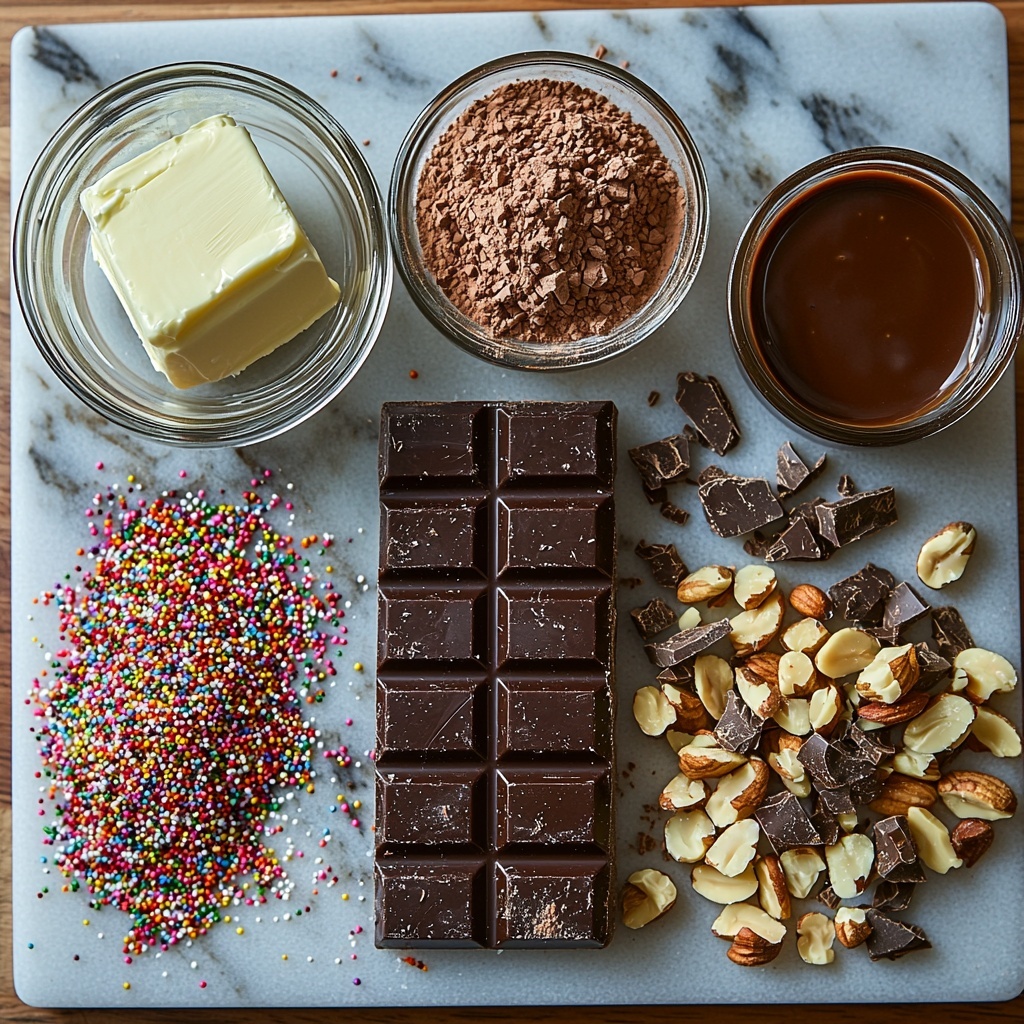
- Quality semi-sweet or bittersweet chocolate bars (two 4-ounce bars, finely chopped): The foundation of flavor, choose high-quality chocolate to ensure the richest and smoothest results.
- Heavy cream (2/3 cup): This adds the luscious creaminess that transforms the chocolate into a silky ganache.
- Unsalted butter (optional, 1 tablespoon): Makes the truffles extra smooth and gives a glossy finish.
- Pure vanilla extract (optional, 1/2 teaspoon): Adds a subtle warmth and depth of flavor.
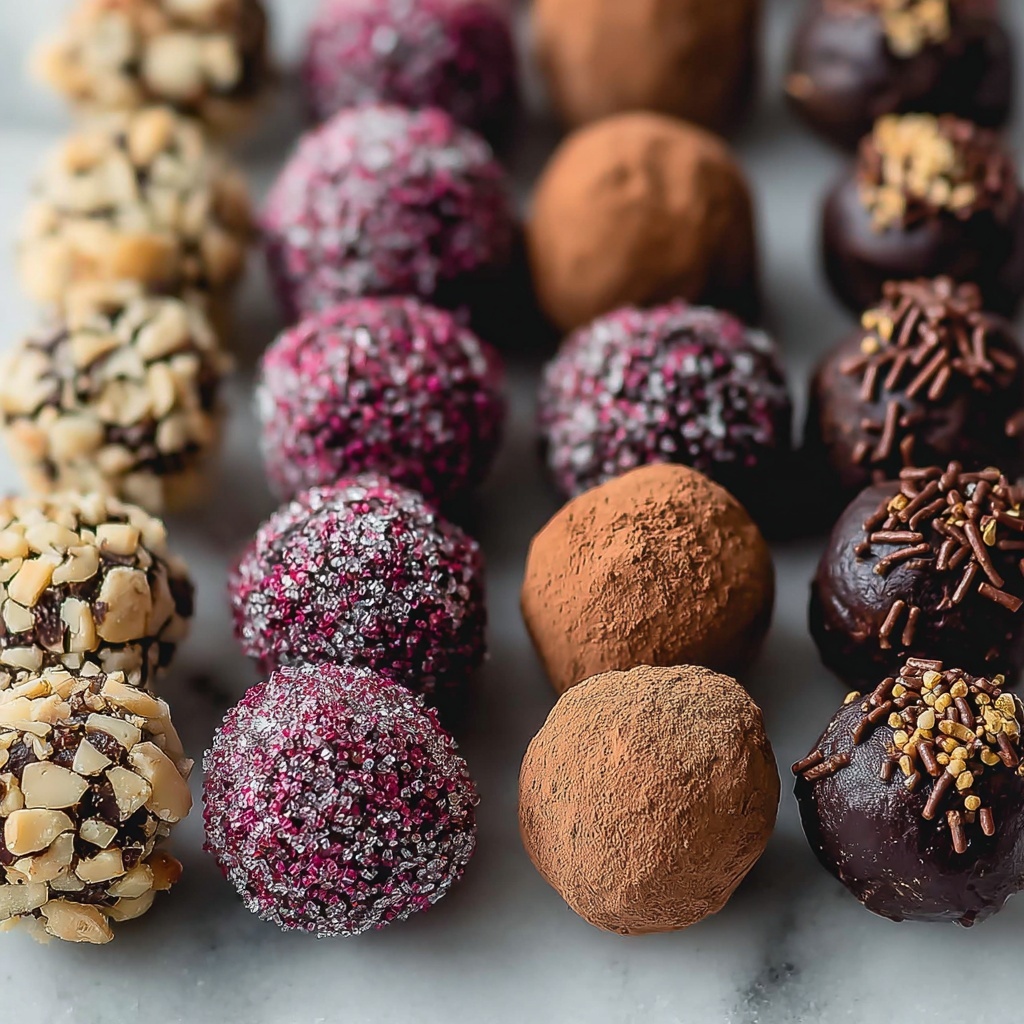
- Toppings: Unsweetened cocoa powder, sprinkles, crushed nuts, or melted chocolate for rolling and decorating your truffles.
How to Make Homemade Chocolate Truffles Recipe
Step 1: Prepare Your Chocolate
Start by placing your finely chopped chocolate into a heat-proof bowl. By having the chocolate ready and waiting, you make the melting process smoother and ensure it blends perfectly with the cream.
Step 2: Heat the Cream
Gently heat your heavy cream until it just reaches a simmer. You can do this over the stove or in a microwave-safe bowl using short bursts. The key is to heat it enough to melt the chocolate but not to boil it, which keeps your final truffle texture silky.
Step 3: Combine Chocolate, Cream, and Flavorings
Add the optional butter to the chopped chocolate, then pour the hot cream evenly over the chocolate. Let this sit undisturbed for about 5 minutes — this gives the heat time to slowly melt the chocolate, resulting in a smooth ganache. Then stir in the vanilla extract and stir until completely glossy and combined. To avoid any condensation forming, cover the surface with plastic wrap and refrigerate for 1-2 hours to allow the mixture to firm up nicely.
Step 4: Shape the Truffles
Once chilled, scoop the firm ganache into small mounds, about 2 teaspoons per truffle (or 1 tablespoon for larger ones). Roll these into smooth balls using your hands. Yes, the ganache is a bit sticky, but that’s part of the fun! Keeping your hands cool and lightly dusted with cocoa powder can help make rolling easier.
Step 5: Add Toppings
Now comes the playful part — roll each truffle in your chosen toppings. Whether you love the classic dusting of cocoa powder, the crunch of crushed nuts, or colorful sprinkles, each coating adds a unique texture and visual appeal to your truffles.
Step 6: Store Properly
Place your finished truffles in an airtight container. They’re best kept at room temperature if you plan to enjoy them within 3 to 4 days, or in the refrigerator if you want to keep them fresh for up to two weeks. Let the cold truffles sit out for a few minutes before serving to bring out their full flavor.
How to Serve Homemade Chocolate Truffles Recipe
Garnishes
Garnishing your truffles is the perfect way to add a personal touch. A light dusting of cocoa powder imparts an elegant, bittersweet contrast, while crushed pistachios or toasted coconut add delightful texture and color. For a bit of sparkle, edible gold leaf or shimmering sugar crystals turn plain truffles into show-stopping treats.
Side Dishes
While these truffles are delicious alone, pairing them with light sides can elevate the experience. Serve alongside fresh berries or a scoop of vanilla ice cream to balance the richness. A cup of strong espresso or a glass of dessert wine can also complement the velvety chocolate flavors beautifully.
Creative Ways to Present
Presentation is part of the joy! Arrange your truffles in mini cupcake liners or delicate paper cups for an elegant look. Placing them in a decorative box tied with ribbon makes a heartfelt gift. For a cozy gathering, display them on a pretty platter dusted with cocoa powder or edible petals for a whimsical touch.
Make Ahead and Storage
Storing Leftovers
If you have any truffles left over, no worries! Keep them stored in an airtight container at room temperature for a few days or in the refrigerator for up to two weeks. Just remember to allow refrigerated truffles to warm to room temperature before serving so the texture is just right.
Freezing
Truffles freeze beautifully. Place them in a single layer on a parchment-lined tray and freeze until solid, then transfer to an airtight container or zip-top bag. When you want a treat, just thaw them gently in the refrigerator overnight or at room temperature for a few hours.
Reheating
Since truffles are best enjoyed at room temperature, reheating isn’t necessary. If they’ve chilled in the fridge or freezer, just let them sit out uncovered for about 15-20 minutes to regain that melt-in-your-mouth softness and rich flavor.
FAQs
Can I use milk chocolate instead of semi-sweet or bittersweet chocolate?
Absolutely! Using milk chocolate will yield a sweeter, creamier truffle, but be mindful that it has more sugar and less cocoa, which changes the flavor profile and firmness slightly.
What’s the best way to chop chocolate for this recipe?
Use a sharp knife and chop the chocolate into very small, uniform pieces. The finer the chop, the more easily and evenly it will melt when combined with the hot cream.
Why do I need to cover the ganache with plastic wrap before refrigerating?
Placing plastic wrap directly on the surface prevents condensation, which can create a watery texture on top. This simple step keeps your ganache smooth and luscious.
Can I add flavors other than vanilla extract?
Definitely! You can experiment with extracts like almond, peppermint, or orange, or even add a splash of liqueur like Grand Marnier or rum for an adult twist.
How long will these truffles last if I make them ahead for a party?
They keep well for up to two weeks in the fridge, making them perfect for preparing in advance. Just bring them to room temperature before serving for the best texture and flavor.
Final Thoughts
There’s something truly magical about making your own Homemade Chocolate Truffles Recipe—it’s a comforting, rewarding experience that results in a luxurious treat perfect for any occasion. Whether you share these silky delights with loved ones or savor them quietly on your own, they’re sure to bring a smile to your face. Give this recipe a try and discover how effortless it is to craft a little piece of chocolate heaven right at home.
Print
Homemade Chocolate Truffles Recipe
- Prep Time: 2 hours 30 minutes
- Cook Time: 0 minutes
- Total Time: 2 hours 30 minutes
- Yield: 20-24 truffles
- Category: Dessert
- Method: No-Cook
- Cuisine: French
Description
This Homemade Chocolate Truffles recipe features rich, creamy, and decadent bite-sized treats made from quality semi-sweet or bittersweet chocolate blended with heavy cream and optionally butter and vanilla extract. These no-bake truffles are easy to prepare and can be coated in various toppings like cocoa powder, sprinkles, nuts, or melted chocolate for a personalized touch. Perfect as elegant homemade gifts or indulgent desserts, they require chilling to set and are best enjoyed at room temperature.
Ingredients
Main Ingredients
- Two 4-ounce (226g) quality semi-sweet or bittersweet chocolate bars, very finely chopped
- 2/3 cup (160ml) heavy cream
- Optional: 1 Tablespoon (14g) unsalted butter, softened to room temperature
- Optional: 1/2 teaspoon pure vanilla extract
Toppings
- Unsweetened cocoa powder
- Sprinkles
- Crushed nuts
- Melted or tempered chocolate
Instructions
- Prepare the Chocolate: Place the finely chopped chocolate in a heat-proof bowl and set aside, ensuring it’s ready to melt evenly when the hot cream is added.
- Heat the Cream: Warm the heavy cream to a simmer either on the stovetop or in the microwave; it should be hot but not boiling.
- Combine and Melt: Add the softened butter to the chocolate if using, then pour the hot cream evenly over the chocolate. Let this mixture rest for 5 minutes to soften the chocolate. Add vanilla extract if desired, then stir thoroughly until the chocolate is completely melted and the ganache is smooth. Cover with plastic wrap directly on the surface to prevent condensation and refrigerate for 1-2 hours until firm. For even setting, pour the mixture into a shallow dish such as an 8-inch square pan.
- Scoop and Shape: Using a small cookie scoop (approximately 2 teaspoons), scoop out the set ganache into mounds. For larger truffles, use a 1 Tablespoon scoop. Roll each mound quickly into smooth, round balls, working swiftly as the mixture can become sticky.
- Add Toppings: Roll each truffle in your choice of toppings such as cocoa powder, sprinkles, crushed nuts, or gently dip in melted chocolate to coat evenly.
- Storage and Serving: Store the finished truffles tightly covered at room temperature for 3-4 days or refrigerate them for up to 2 weeks. Truffles taste best when served at room temperature, allowing their creamy texture and flavors to shine.
Notes
- Chop the chocolate finely to ensure smooth melting and a creamy ganache.
- Use heavy cream for the best richness and texture in your truffles.
- Optional butter adds extra creaminess but can be omitted for a dairy-lighter version.
- Vanilla extract enhances flavor but is optional.
- Set the ganache in a shallow dish to chill quickly and evenly.
- Work quickly when rolling truffles as the mixture can soften and become sticky.
- Store truffles in an airtight container to maintain freshness.
- Allow refrigerated truffles to warm to room temperature before serving for the best texture.
