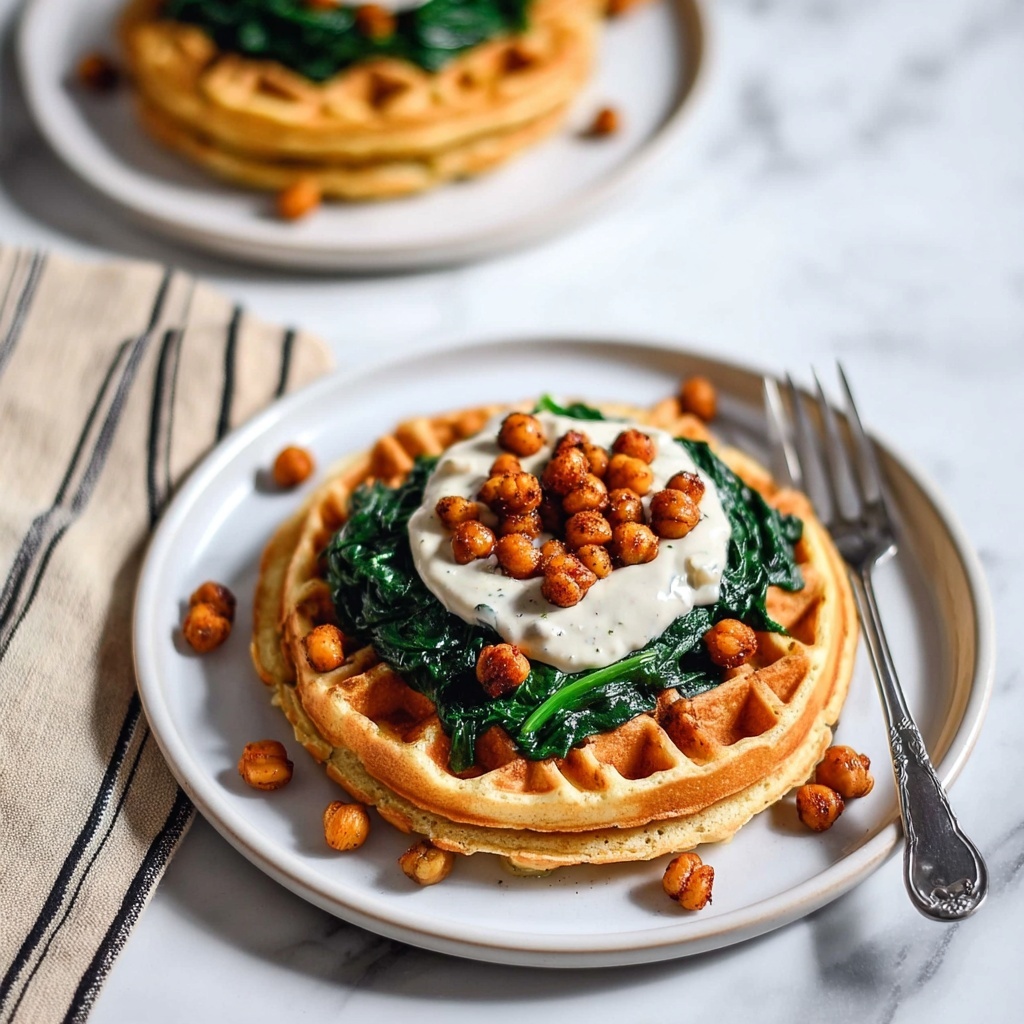
If you are craving a snack that is both crunchy and bursting with flavor, then you have to try Chickpea Waffles: The Easiest Crispy Roast & Serve Recipe. This delightful dish transforms humble chickpeas into golden, crisp bites that are perfect for munching anytime. With just a handful of pantry staples, you get a snack that combines smoky, garlicky, and slightly sweet notes wrapped in a satisfyingly crunchy texture. It’s such a simple yet impressive treat that will quickly become your go-to whenever hunger strikes.
Ingredients You’ll Need
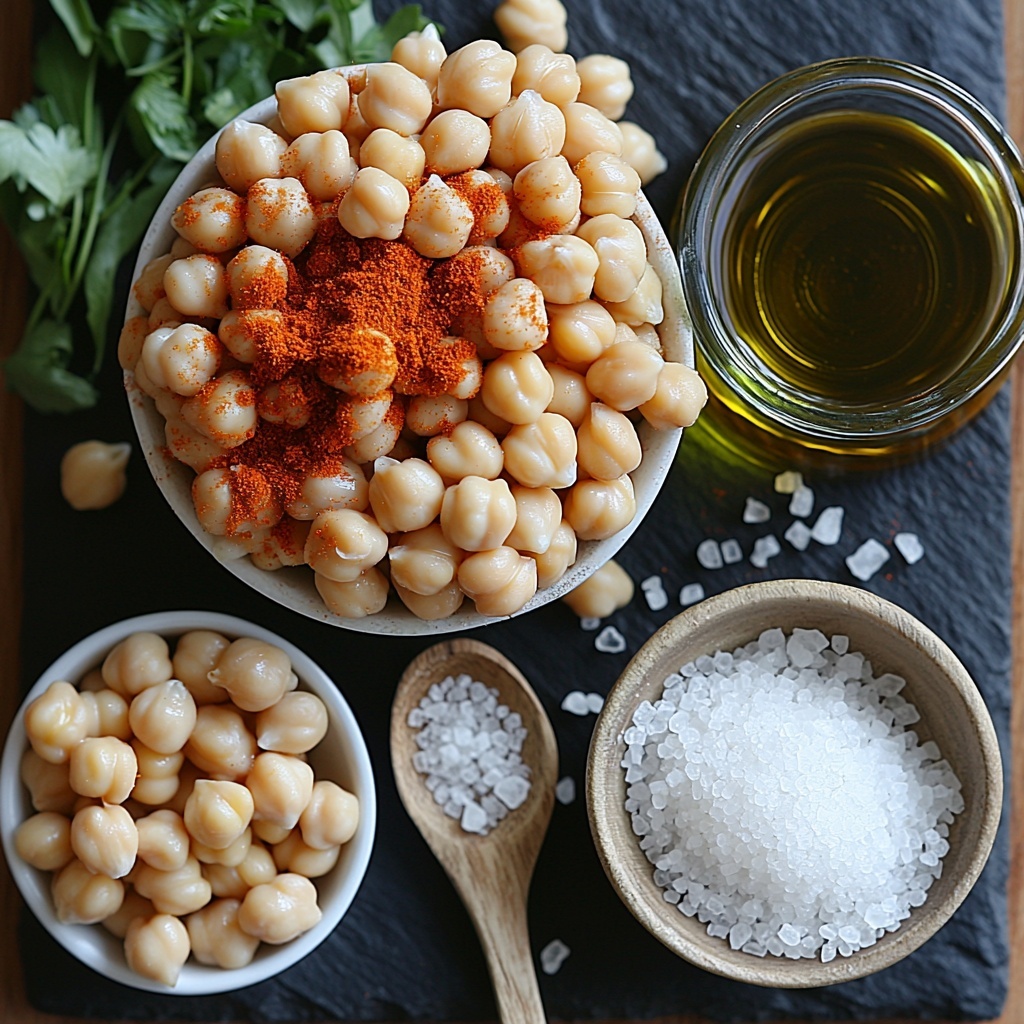
Getting together the ingredients for these chickpea waffles is refreshingly straightforward, which makes this recipe all the more appealing. Each ingredient plays an important role in building the perfect balance of spice, texture, and color for your crispy roast.
- 15-oz can chickpeas: The star of the show, providing protein, fiber, and a sturdy base that crisps up beautifully.
- ½ teaspoon smoked paprika: Adds a subtle smoky warmth that infuses each bite with depth.
- ½ teaspoon granulated garlic: Brings an assertive garlicky punch without overpowering the chickpeas.
- ¼ teaspoon sugar: Just a touch to balance the spices and create a gentle caramelized finish.
- Salt and freshly ground black pepper: Essential for seasoning and enhancing all the flavors.
- 1 tablespoon extra virgin olive oil: Helps the chickpeas crisp while adding a silky richness.
How to Make Chickpea Waffles: The Easiest Crispy Roast & Serve Recipe
Step 1: Prepare the Oven and Baking Sheet
First things first, preheat your oven to 450˚F (232˚C). Lining a baking sheet with parchment paper ensures your chickpea waffles won’t stick, making cleanup a breeze and preserving their beautiful crunch.
Step 2: Arrange the Chickpeas
After draining, rinsing, and drying your chickpeas thoroughly with paper towels, spread them out evenly on your prepared baking sheet. This even spacing is key to roasting them into irresistibly crisp bites without steaming.
Step 3: Season and Oil the Chickpeas
Sprinkle your chickpeas with smoked paprika, granulated garlic, sugar, salt, and black pepper, then drizzle the olive oil on top. Toss everything well so each chickpea is luxuriously coated. This seasoning mix is what makes these chickpea waffles truly unforgettable.
Step 4: Roast to Crispy Perfection
Place the baking sheet in the oven and roast for 15 minutes. To ensure even cooking, shake the pan twice during roasting. You’ll notice the chickpeas splitting open and turning irresistibly crunchy—this is exactly what you want for that perfect waffle texture.
Step 5: Final Seasoning Touch
Once roasted, immediately sprinkle on extra salt and pepper to taste. This last seasoning layer amplifies the flavor just before serving, making every bite pop.
Step 6: Serve Hot and Crispy
These chickpea waffles are best enjoyed fresh from the oven when they’re at their peak crispness. However, if you want to prepare ahead, you can store them uncovered at room temperature for up to 2 hours without losing that delightful crunch.
How to Serve Chickpea Waffles: The Easiest Crispy Roast & Serve Recipe
Garnishes
Adding garnishes not only makes your chickpea waffles look extra inviting but also layers in fresh flavor and texture. Consider sprinkling chopped fresh parsley or cilantro for brightness, or a squeeze of lemon juice to cut through the smoky richness. A dash of nutritional yeast can add a cheesy hint if you’re feeling adventurous.
Side Dishes
Pair these chickpea waffles with simple sides like a crisp garden salad or creamy hummus for dipping. They also complement Mediterranean-inspired dishes like tabbouleh or roasted vegetables, making them a versatile companion for various meals.
Creative Ways to Present
Why not get playful with presentation? Use these crispy chickpea waffles as a crunchy topping on avocado toast or crumble them over a creamy soup for contrast. They also work well nestled in grain bowls or as a creative salad topper to add that satisfying roast and serve crunch.
Make Ahead and Storage
Storing Leftovers
If you have leftovers, keep them in an airtight container at room temperature for up to one day. Avoid refrigeration as it tends to soften the crisp exterior you worked so hard to achieve.
Freezing
Freezing isn’t generally recommended for these chickpea waffles because they can lose their crispness upon thawing. It’s better to enjoy them fresh, or prepare smaller batches for immediate enjoyment.
Reheating
To bring back their crispness if the chickpea waffles have gone a bit soft, pop them in a preheated oven at 375˚F (190˚C) for about 5 minutes. Avoid microwaving, which will make them soggy.
FAQs
Can I use dried chickpeas instead of canned?
Absolutely! Just be sure to soak and cook your dried chickpeas fully before roasting. This will ensure they crisp up just as well as canned ones.
How spicy is this recipe?
This recipe is mild with gentle smoky and garlic notes. You can easily adjust the paprika or add cayenne pepper for extra heat if you prefer a spicier kick.
Are these chickpea waffles vegan and gluten-free?
Yes, they are naturally vegan and gluten-free, making them a fantastic snack option for various dietary preferences.
Can I make this recipe without olive oil?
Olive oil helps achieve that perfect crisp and carries the seasoning flavors beautifully, but you could substitute with another neutral oil like avocado oil if needed.
What’s the best way to achieve a really crispy texture?
Ensuring the chickpeas are thoroughly dried before roasting and giving them space on the baking sheet are the keys to maximum crispness.
Final Thoughts
Once you try this Chickpea Waffles: The Easiest Crispy Roast & Serve Recipe, you’ll wonder how you ever lived without it. It’s a quick, healthy, and downright addictive snack that feels special without any fuss. I truly hope you enjoy making and savoring these crunchy little bites as much as I do—happy roasting!
Print
Chickpea Waffles: The Easiest Crispy Roast & Serve Recipe
- Prep Time: 10 minutes
- Cook Time: 15 minutes
- Total Time: 25 minutes
- Yield: 2 servings
- Category: Snack
- Method: Roasting
- Cuisine: Mediterranean
- Diet: Vegan
Description
Crispy and flavorful chickpea waffles made by roasting seasoned chickpeas in the oven, perfect for a quick, healthy snack or appetizer with smoky, garlicky notes and a satisfying crunch.
Ingredients
Ingredients
- 1 15-oz can chickpeas, drained, rinsed and patted dry with paper towels
- ½ teaspoon smoked paprika
- ½ teaspoon granulated garlic (or garlic powder)
- ¼ teaspoon sugar
- Salt and freshly ground black pepper, to taste
- 1 tablespoon extra virgin olive oil
Instructions
- Preheat Oven: Preheat your oven to 450˚F (232˚C) and line a baking sheet with parchment paper to prevent sticking and make cleanup easier.
- Prepare Chickpeas: Spread the drained, rinsed, and dried chickpeas evenly on the lined baking sheet to ensure even roasting for a crispy texture.
- Season Chickpeas: Sprinkle the chickpeas with smoked paprika, granulated garlic, sugar, salt, and freshly ground black pepper. Drizzle with extra virgin olive oil, then toss well to coat all chickpeas evenly.
- Roast Chickpeas: Place the baking sheet in the preheated oven and roast the chickpeas for 15 minutes, shaking the pan twice during roasting to ensure even cooking and crispiness. Roast until chickpeas are crispy and start to split.
- Final Seasoning: Remove chickpeas from the oven and immediately season with additional salt and freshly ground black pepper to taste for enhanced flavor.
- Serve: Serve the chickpea waffles hot to enjoy the best texture. Alternatively, these roasted chickpeas can be prepared up to 2 hours in advance and stored uncovered at room temperature to maintain their crunch.
Notes
- Make sure to pat the chickpeas very dry before roasting to achieve maximum crispiness.
- Shaking the pan during roasting helps promote even cooking and prevents burning.
- These chickpea waffles are best enjoyed fresh, but can be stored uncovered for a couple of hours without losing their crunch.
- Adjust seasoning to taste, especially salt and pepper, as this enhances the flavor after roasting.

